Blinky, your “Hello World!”, on STM32F4-Discovery
This tutorial shows you how to create, build, and run the Blinky application on the STM32F4-Discovery board.
Prerequisites
Meet the prerequisites listed in Project Blinky.
Have a STM32F4-Discovery board.
Have a USB type A to Mini-B cable.
Install a patched version of OpenOCD 0.10.0 described in Install OpenOCD.
Create a Project
Create a new project if you do not have an existing one. You can skip this step and proceed to Create the Targets if you already have a project created.
Run the following commands to create a new project:
$ mkdir ~/dev
$ cd ~/dev
$ newt new myproj
Downloading project skeleton from apache/mynewt-blinky...
Installing skeleton in myproj...
Project myproj successfully created.
$ cd myproj
$ newt upgrade
Downloading repository mynewt-core (commit: master) ...
apache-mynewt-core successfully upgraded to version 1.7.0
$
Create the Targets
Create two targets for the STM32F4-Discovery board - one for the bootloader and one for the Blinky application.
Run the following newt target commands, from your project directory,
to create a bootloader target. We name the target stm32f4disc_boot:
$ newt target create stm32f4disc_boot
$ newt target set stm32f4disc_boot app=@mcuboot/boot/mynewt
$ newt target set stm32f4disc_boot bsp=@apache-mynewt-core/hw/bsp/stm32f4discovery
$ newt target set stm32f4disc_boot build_profile=optimized
Run the following newt target commands to create a target for the
Blinky application. We name the target stm32f4disc_blinky:
$ newt target create stm32f4disc_blinky
$ newt target set stm32f4disc_blinky app=apps/blinky
$ newt target set stm32f4disc_blinky bsp=@apache-mynewt-core/hw/bsp/stm32f4discovery
$ newt target set stm32f4disc_blinky build_profile=debug
You can run the newt target show command to verify the target
settings:
$ newt target show
targets/my_blinky_sim
    app=apps/blinky
    bsp=@apache-mynewt-core/hw/bsp/native
    build_profile=debug
targets/stm32f4disc_blinky
    app=apps/blinky
    bsp=@apache-mynewt-core/hw/bsp/stm32f4discovery
    build_profile=debug
targets/stm32f4disc_boot
    app=@mcuboot/boot/mynewt
    bsp=@apache-mynewt-core/hw/bsp/stm32f4discovery
    build_profile=optimized
Build the Target Executables
Run the newt build stm32f4disc_boot command to build the bootloader:
$ newt build stm32f4disc_boot
Building target targets/stm32f4disc_boot
Compiling repos/mcuboot/boot/bootutil/src/image_ec.c
Compiling repos/mcuboot/boot/bootutil/src/image_ec256.c
Compiling repos/mcuboot/boot/bootutil/src/bootutil_misc.c
Compiling repos/mcuboot/boot/mynewt/src/main.c
Compiling repos/mcuboot/boot/bootutil/src/image_rsa.c
Compiling repos/mcuboot/boot/bootutil/src/image_validate.c
Compiling repos/mcuboot/boot/bootutil/src/loader.c

    ...

Archiving sys_flash_map.a
Archiving sys_mfg.a
Archiving sys_sysinit.a
Archiving util_mem.a
Linking ~/dev/myproj/bin/targets/stm32f4disc_boot/app/boot/mynwet/mynewt.elf
Target successfully built: targets/stm32f4disc_boot
Run the newt build stm32f4disc_blinky command to build the Blinky
application:
$newt build stm32f4disc_blinky
Building target targets/stm32f4disc_blinky
Compiling apps/blinky/src/main.c
Compiling repos/apache-mynewt-core/hw/bsp/stm32f4discovery/src/sbrk.c
Compiling repos/apache-mynewt-core/hw/bsp/stm32f4discovery/src/system_stm32f4xx.c
Compiling repos/apache-mynewt-core/hw/bsp/stm32f4discovery/src/hal_bsp.c
Assembling repos/apache-mynewt-core/hw/bsp/stm32f4discovery/src/arch/cortex_m4/startup_STM32F40x.s
Compiling repos/apache-mynewt-core/hw/cmsis-core/src/cmsis_nvic.c
Compiling repos/apache-mynewt-core/hw/drivers/uart/src/uart.c
Compiling repos/apache-mynewt-core/hw/drivers/uart/uart_hal/src/uart_hal.c
Compiling repos/apache-mynewt-core/hw/hal/src/hal_common.c
Compiling repos/apache-mynewt-core/hw/hal/src/hal_flash.c

    ...

Archiving sys_sysinit.a
Archiving util_mem.a
Linking ~/dev/myproj/bin/targets/stm32f4disc_blinky/app/apps/blinky/blinky.elf
Target successfully built: targets/stm32f4disc_blinky
Sign and Create the Blinky Application Image
Run the newt create-image stm32f4disc_blinky 1.0.0 command to create
and sign the application image. You may assign an arbitrary version
(e.g. 1.0.0) to the image.
$newt create-image stm32f4disc_blinky 1.0.0
App image succesfully generated: ~/dev/myproj/bin/targets/stm32f4disc_blinky/app/apps/blinky/blinky.img
Connect to the Board
Connect a USB type A to Mini-B cable from your computer to the port the board indicated on the diagram:
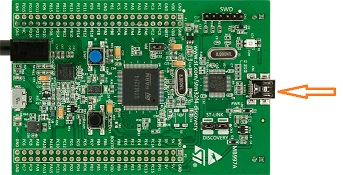
You should see the small PWR red LED light up.
Load the Bootloader and the Blinky Application Image
Run the newt load stm32f4disc_boot command to load the bootloader
onto the board:
$ newt load stm32f4disc_boot
Loading bootloader
Note: If you are using Windows and get an open failed or
no device found error, you will need to install the usb driver.
Download Zadig and run it:
Select Options > List All Devices.
Select
STM32 STLinkfrom the drop down menu.Select the
WinUSBdriver.Click Install Driver.
Run the
newt load stm32f4disc_bootcommand again.
Note: If you are running Linux and get an open failed message, there
are two common issues with this board. If you have a board produced
before mid-2016, it is likely that you have an older version of the
ST-LINK programmer. To correct this, open the
repos/apache-mynewt-core/hw/bsp/stm32f4discovery/f4discovery.cfg
file in a text editor, and change the line:
source [find interface/stlink-v2-1.cfg]
to:
source [find interface/stlink-v2.cfg]
If you receive an error like
libusb_open() failed with LIBUSB_ERROR_ACCESS, it means that your
udev rules are not correctly set up for this device. You can find
some example udev rules for ST-LINK programmers
here.
Run the newt load stm32f4disc_blinky command to load the Blinky
application image onto the board.
$ newt load stm32f4disc_blinky
Loading app image into slot 1
You should see the small green LD4 LED on the board blink!
Note: If the LED does not blink, try resetting your board.
If you want to erase the flash and load the image again, start a debug
session, and enter mon stm32f2x mass_erase 0 at the gdb prompt:
Note: The output of the debug session below is for Mac OS and Linux platforms. On Windows, openocd and gdb are started in separate Windows Command Prompt terminals, and the terminals are automatically closed when you quit gdb. In addition, the output of openocd is logged to the openocd.log file in your project’s base directory instead of the terminal.
$ newt debug stm32f4disc_blinky
[~/dev/myproj/repos/apache-mynewt-core/hw/bsp/stm32f4discovery/stm32f4discovery_debug.sh ~/dev/myproj/repos/apache-mynewt-core/hw/bsp/stm32f4discovery ~/dev/myproj/bin/targets/stm32f4disc_blinky/app/apps/blinky/blinky]
Open On-Chip Debugger 0.10.0
Licensed under GNU GPL v2
For bug reports, read
        http://openocd.org/doc/doxygen/bugs.html
Info : The selected transport took over low-level target control. The results might differ compared to plain JTAG/SWD
adapter speed: 2000 kHz
adapter_nsrst_delay: 100
none separate
Info : Unable to match requested speed 2000 kHz, using 1800 kHz
Info : Unable to match requested speed 2000 kHz, using 1800 kHz
Info : clock speed 1800 kHz
Info : STLINK v2 JTAG v25 API v2 SWIM v14 VID 0x0483 PID 0x374B
Info : using stlink api v2
Info : Target voltage: 2.881129
Info : stm32f4x.cpu: hardware has 6 breakpoints, 4 watchpoints
target halted due to debug-request, current mode: Thread

           ...

Reading symbols from ~/dev/myproj/bin/targets/stm32f4disc_blinky/app/apps/blinky/blinky.elf...done.
target halted due to debug-request, current mode: Thread
xPSR: 0x41000000 pc: 0x08021e90 psp: 0x20002290
Info : accepting 'gdb' connection on tcp/3333
Info : device id = 0x10076413
Info : flash size = 1024kbytes
0x08021e90 in __WFI () at repos/apache-mynewt-core/hw/cmsis-core/src/ext/core_cmInstr.h:342
342       __ASM volatile ("wfi");
(gdb) mon stm32f2x mass_erase 0
stm32x mass erase complete
stm32x mass erase complete
(gdb)