Blinky, your “Hello World!”, on Arduino Primo
This tutorial shows you how to create, build, and run the Blinky application on an Arduino Primo board.
Note that the Mynewt OS will run on the nRF52 chip in the Arduino Primo board. However, the board support package for the Arduino Primo is different from the nRF52 dev kit board support package.
Prerequisites
Meet the the prerequisites listed in Project Blinky.
Have an Arduino Primo board.
Install a debugger. Choose one of the two options below: Option 1 requires additional hardware but very easy to set up.
Option 1
Segger J-Link Debug Probe - any model (this tutorial has been tested with J-Link EDU and J-Link Pro)
J-Link 9 pin Cortex-M Adapter that allows JTAG, SWD and SWO connections between J-Link and Cortex M based target hardware systems
Install the Segger JLINK Software and documentation pack.
Option 2
This board requires a patch version of OpenOCD 0.10.0 that is in development. See Install OpenOCD instructions to install it if you do not have this version installed.
You can now use openocd to upload to Arduino Primo board via the USB port itself.
Create a Project
Create a new project if you do not have an existing one. You can skip this step and proceed to Create the Targets if you already created a project.
Run the following commands to create a new project:
$ mkdir ~/dev
$ cd ~/dev
$ newt new myproj
Downloading project skeleton from apache/mynewt-blinky...
Installing skeleton in myproj...
Project myproj successfully created.
$ cd myproj
$ newt upgrade
Downloading repository mynewt-core (commit: master) ...
Downloading repository mynewt-nimble (commit: master) ...
Downloading repository mcuboot (commit: master) ...
Downloading repository mynewt-mcumgr (commit: master) ...
Making the following changes to the project:
apache-mynewt-core successfully upgraded to version 1.7.0
apache-mynewt-nimble successfully upgraded to version 1.2.0
mcuboot successfully upgraded to version 1.3.1
$
Create the Targets
Create two targets for the Arduino Primo board - one for the bootloader and one for the Blinky application.
Run the following newt target commands, from your project directory,
to create a bootloader target. We name the target primo_boot.
$ newt target create primo_boot
$ newt target set primo_boot app=@mcuboot/boot/mynewt bsp=@apache-mynewt-core/hw/bsp/arduino_primo_nrf52 build_profile=optimized
Run the following newt target commands to create a target for the
Blinky application. We name the target primoblinky.
$ newt target create primoblinky
$ newt target set primoblinky app=apps/blinky bsp=@apache-mynewt-core/hw/bsp/arduino_primo_nrf52 build_profile=debug
If you are using openocd, run the following newt target set
commands:
$ newt target set primoblinky syscfg=OPENOCD_DEBUG=1
$ newt target set primo_boot syscfg=OPENOCD_DEBUG=1
You can run the newt target show command to verify the target
settings:
$ newt target show
targets/my_blinky_sim
    app=apps/blinky
    bsp=@apache-mynewt-core/hw/bsp/native
    build_profile=debug
targets/primo_boot
    app=@mcuboot/boot/mynewt
    bsp=@apache-mynewt-core/hw/bsp/arduino_primo_nrf52
    build_profile=optimized
targets/primoblinky
    app=@apache-mynewt-core/apps/blinky
    bsp=@apache-mynewt-core/hw/bsp/arduino_primo_nrf52
    build_profile=optimized
Build the Target Executables
Run the newt build primo_boot command to build the bootloader:
$ newt build primo_boot
Building target targets/primo_boot
Compiling repos/mcuboot/boot/bootutil/src/image_rsa.c
Compiling repos/mcuboot/boot/bootutil/src/image_ec256.c
Compiling repos/apache-mynewt-core/crypto/mbedtls/src/aes.c
Compiling repos/mcuboot/boot/mynewt/src/main.c
Compiling repos/mcuboot/boot/bootutil/src/image_ec.c
Compiling repos/mcuboot/boot/bootutil/src/loader.c
Compiling repos/mcuboot/boot/bootutil/src/bootutil_misc.c

      ...

Archiving sys_mfg.a
Archiving sys_sysinit.a
Archiving util_mem.a
Linking ~/dev/myproj/bin/targets/primo_boot/app/boot/mynewt/mynewt.elf
Target successfully built: targets/primo_boot
Run the newt build primoblinky command to build the Blinky
application:
$ newt build primoblinky
Building target targets/primoblinky
Compiling repos/apache-mynewt-core/hw/drivers/uart/src/uart.c
Assembling repos/apache-mynewt-core/hw/bsp/arduino_primo_nrf52/src/arch/cortex_m4/gcc_startup_nrf52.s
Compiling repos/apache-mynewt-core/hw/bsp/arduino_primo_nrf52/src/sbrk.c
Compiling repos/apache-mynewt-core/hw/cmsis-core/src/cmsis_nvic.c
Assembling repos/apache-mynewt-core/hw/bsp/arduino_primo_nrf52/src/arch/cortex_m4/gcc_startup_nrf52_split.s
Compiling apps/blinky/src/main.c
Compiling repos/apache-mynewt-core/hw/drivers/uart/uart_bitbang/src/uart_bitbang.c
Compiling repos/apache-mynewt-core/hw/bsp/arduino_primo_nrf52/src/hal_bsp.c

      ...

Archiving sys_mfg.a
Archiving sys_sysinit.a
Archiving util_mem.a
Linking ~/dev/myproj/bin/targets/primoblinky/app/apps/blinky/blinky.elf
Target successfully built: targets/primoblinky
Sign and Create the Blinky Application Image
Run the newt create-image primoblinky 1.0.0 command to create and
sign the application image. You may assign an arbitrary version (e.g.
1.0.0) to the image.
$ newt create-image primoblinky 1.0.0
App image succesfully generated: ~/dev/myproj/bin/targets/primoblinky/app/apps/blinky/blinky.img
Connect to the Board
Connect a micro USB cable to the Arduino Primo board and to your computer’s USB port.
If you are using the Segger J-Link debug probe, connect the debug probe to the JTAG port on the Primo board using the Jlink 9-pin adapter and cable. Note that there are two JTAG ports on the board. Use the one nearest to the reset button as shown in the picture.
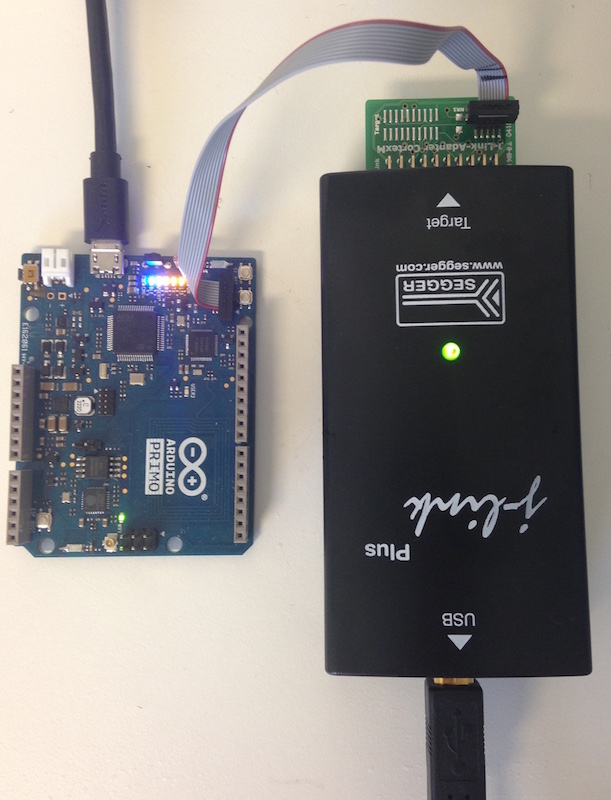
J-Link debug probe to Arduino
Note: If you are using the OpenOCD debugger, you do not need to attach this connector.
Load the Bootloader
Run the newt load primo_boot command to load the bootloader onto the
board:
$ newt load primo_boot
Loading bootloader
$
Note: If you are using OpenOCD on a Windows platform and you get an
unable to find CMSIS-DAP device error, you will need to download and
install the mbed Windows serial port driver from
https://developer.mbed.org/handbook/Windows-serial-configuration. Follow
the instructions from the site to install the driver. Here are some
additional notes about the installation:
The instructions indicate that the mbed Windows serial port driver is not required for Windows 10. If you are using Windows 10 and get the
unable to find CMSIS-DAP deviceerror, we recommend that you install the driver.If the driver installation fails, we recommend that you download and install the Arduino Primo CMSIS-DAP driver. Perform the following steps:
Download the Arduino Primo CMSIS-DAP driver and extract the zip file.
Start Device Manager.
Select Other Devices > CMSIS-DAP CDC > Properties > Drivers > Update Driver….
Select Browse my computer for driver software.
Select the Arduino Driver folder where extracted the drivers to (check the include subfolders). Click Next to install the driver.
Run the newt load primo_boot command again.
Load the Blinky Application Image
Run the newt load primoblinky command to load the Blinky application image onto the board.
$ newt  load primoblinky
Loading app image into slot 1
$
You should see the orange LED (L13), below the ON LED, on the board blink!
Note: If the LED does not blink, try resetting the board. If that doesn’t work, you may have an older version of the Arduino Primo, and will need to change the defined LED blink pin. To change the LED blink pin, go to the Arduino Primo BSP header file in the repos directory (~/dev/myproj/repos/apache-mynewt-core/hw/bsp/arduino_primoo_nrf52/include/bsp/bsp.h) and change the LED_BLINK_PIN from 20 to 25.
Erase Flash
If you want to erase the flash and load the image again, use JLinkExe and issue the erase command when you are using the
Jlink debug probe:
Note: On Windows: Run the jlink command with the same arguments
from a Windows Command Prompt terminal.
$ JLinkExe -device nRF52 -speed 4000 -if SWD
SEGGER J-Link Commander V5.12c (Compiled Apr 21 2016 16:05:51)
DLL version V5.12c, compiled Apr 21 2016 16:05:45

Connecting to J-Link via USB...O.K.
Firmware: J-Link OB-SAM3U128-V2-NordicSemi compiled Mar 15 2016 18:03:17
Hardware version: V1.00
S/N: 682863966
VTref = 3.300V


Type "connect" to establish a target connection, '?' for help
J-Link>erase
Cortex-M4 identified.
Erasing device (0;?i?)...
Comparing flash   [100%] Done.
Erasing flash     [100%] Done.
Verifying flash   [100%] Done.
J-Link: Flash download: Total time needed: 0.363s (Prepare: 0.093s, Compare: 0.000s, Erase: 0.262s, Program: 0.000s, Verify: 0.000s, Restore: 0.008s)
Erasing done.
J-Link>exit
$
If you are using the OpenOCD debugger, run the
newt debug primoblinky command and issue the highlighted command at
the (gdb) prompt:
Note: The output of the debug session below is for Mac OS and Linux platforms. On Windows, openocd and gdb are started in separate Windows Command Prompt terminals, and the terminals are automatically closed when you quit gdb. In addition, the output of openocd is logged to the openocd.log file in your project’s base directory instead of the terminal.
$ newt debug primoblinky
[~/dev/myproj/repos/apache-mynewt-core/hw/bsp/arduino_primo_nrf52/primo_debug.sh ~/dev/myproj/repos/apache-mynewt-core/hw/bsp/arduino_primo_nrf52 ~/dev/myproj/bin/targets/primoblinky/app/apps/blinky/blinky]
Open On-Chip Debugger 0.10.0-dev-snapshot (2017-03-28-11:24)

    ...

os_tick_idle (ticks=128)
    at repos/apache-mynewt-core/hw/mcu/nordic/nrf52xxx/src/hal_os_tick.c:200
warning: Source file is more recent than executable.
200    if (ticks > 0) {
(gdb) mon nrf52 mass_erase