Blinky, your “Hello World!”, on Arduino Zero
This tutorial shows you how to create, build and run the Blinky application on an Arduino Zero board.
Prerequisites
Meet the prerequisites listed in Project Blinky.
Have an Arduino Zero board. Note: There are many flavors of Arduino. Make sure you are using an Arduino Zero. See below for the versions of Arduino Zero that are compatible with this tutorial.
Install the OpenOCD debugger.
This tutorial uses the Arduino Zero Pro board. The tutorial has been tested on the following three Arduino Zero boards - Zero, M0 Pro, and Zero-Pro.
Mynewt has not been tested on Arduino M0 which has no internal debugger support.
Create a Project
Create a new project if you do not have an existing one. You can skip this step and proceed to Fetch External Packages if you already created a project.
Run the following commands to create a new project:
$ mkdir ~/dev
$ cd ~/dev
$ newt new myproj
Downloading project skeleton from apache/mynewt-blinky...
Installing skeleton in myproj...
Project myproj successfully created.
$ cd myproj
$ newt upgrade
Downloading repository mynewt-core (commit: master) ...
apache-mynewt-core successfully upgraded to version 1.7.0
$
Fetch External Packages
Mynewt uses source code provided directly from the chip manufacturer for low level operations. Sometimes this code is licensed only for the specific manufacturer of the chipset and cannot live in the Apache Mynewt repository. That happens to be the case for the Arduino Zero board which uses Atmel SAMD21. Runtime’s github repository hosts such external third-party packages and the newt tool can fetch them.
To fetch the package with MCU support for Atmel SAMD21 for Arduino Zero
from the Runtime git repository, you need to add the repository to the
project.yml file in your base project directory.
Here is an example project.yml file with the Arduino Zero repository
added. The sections with mynewt_arduino_zero that need to be added
to your project file are highlighted.
Note: On Windows platforms: You need to set vers to 0-dev
and use the latest master branch for both repositories.
# project.yml
project.name: "my_project"

project.repositories:
    - apache-mynewt-core
    - mynewt_arduino_zero

repository.apache-mynewt-core:
    type: github
    vers: 1-latest
    user: apache
    repo: mynewt-core

repository.mynewt_arduino_zero:
    type: github
    vers: 1-latest
    user: runtimeco
    repo: mynewt_arduino_zero
Install the project dependencies using the newt upgrade command
(you can specify -v for verbose output):
$ newt upgrade
Downloading repository mynewt-core (commit: master) ...
Downloading repository mynewt_arduino_zero (commit: master) ...
apache-mynewt-core successfully upgraded to version 1.7.0
mynewt_arduino_zero successfully upgraded to version 1.7.0
$
You need to create two targets for the Arduino Zero Pro board, one for the bootloader and one for the Blinky application.
Run the following newt target commands, from your project
directory, to create a bootloader target. We name the target
arduino_boot.
$ newt target create arduino_boot
$ newt target set arduino_boot bsp=@mynewt_arduino_zero/hw/bsp/arduino_zero
$ newt target set arduino_boot app=@mcuboot/boot/mynewt
$ newt target set arduino_boot build_profile=optimized
Target targets/arduino_boot successfully set target.build_profile to optimized
$ newt target set arduino_boot syscfg=BSP_ARDUINO_ZERO_PRO=1
Target targets/arduino_boot successfully set target.syscfg to BSP_ARDUINO_ZERO_PRO=1
$
Note: If you have an Arduino Zero instead of an Arduino Zero Pro or
Arduino M0 Pro board, replace BSP_ARDUINO_ZERO_PRO with
BSP_ARDUINO_ZERO in the last newt target set command.
These commands perform the following:
Create a target named
arduino_bootfor the Arduino Zero Bootloader.Set the application for the
arduino_boottarget to the default MCUBoot bootloader (@mcuboot/boot/mynewt)Set the board support package for the target to
@mynewt_arduino_zero/hw/bsp/arduino_zero. This is a reference to the downloaded Arduino Zero support from Github.Use the “optimized” build profile for the
arduino_boottarget. This instructs Newt to generate smaller and more efficient code for this target. This setting is necessary due to the bootloader’s strict size constraints.Sets the system configuration setting for Board Support Package to support the Arduino Zero Pro.
See the Concepts for more information on setting options.
Create a Target for the Blinky Application
Run the following newt target commands to create the
Blinky application target. We name the application target
arduino_blinky.
$ newt target create arduino_blinky
Target targets/arduino_blinky successfully created
$ newt target set arduino_blinky app=apps/blinky
Target targets/arduino_blinky successfully set target.app to apps/blinky
$ newt target set arduino_blinky bsp=@mynewt_arduino_zero/hw/bsp/arduino_zero
Target targets/arduino_blinky successfully set target.bsp to @mynewt_arduino_zero/hw/bsp/arduino_zero
$ newt target set arduino_blinky build_profile=debug
Target targets/arduino_blinky successfully set target.build_profile to debug
$ newt target set arduino_blinky syscfg=BSP_ARDUINO_ZERO_PRO=1
Target targets/arduino_boot successfully set target.syscfg to BSP_ARDUINO_ZERO_PRO=1
$
Note: If you have an Arduino Zero instead of a Arduino Zero Pro
board, replace BSP_ARDUINO_ZERO_PRO with BSP_ARDUINO_ZERO in the
last newt target set command.
Build the Bootloader
Run the newt build arduino_boot command to build the bootloader:
$ newt build arduino_boot
Building target targets/arduino_boot
Compiling bin/targets/arduino_boot/generated/src/arduino_boot-sysinit-app.c
Compiling repos/mcuboot/boot/bootutil/src/image_rsa.c
Compiling repos/mcuboot/boot/bootutil/src/image_ec.c
Compiling repos/mcuboot/boot/bootutil/src/image_ec256.c
Compiling bin/targets/arduino_boot/generated/src/arduino_boot-sysflash.c
Compiling repos/mcuboot/boot/bootutil/src/image_validate.c
Compiling repos/mcuboot/boot/bootutil/src/bootutil_misc.c
Compiling repos/mcuboot/boot/mynewt/src/main.c
Compiling repos/apache-mynewt-core/crypto/mbedtls/src/arc4.c
Compiling repos/mcuboot/boot/bootutil/src/loader.c
Compiling repos/apache-mynewt-core/crypto/mbedtls/src/aes.c

      ....

Archiving sys_mfg.a
Archiving sys_sysinit.a
Archiving util_mem.a
Linking ~/dev/myproj/bin/targets/arduino_boot/app/boot/mynewt/mynewt.elf
Target successfully built: targets/arduino_boot
Build the Blinky Application
Run the newt build arduino_blinky command to build the Blinky
application image:
$ newt build arduino_blinky
Building target targets/arduino_blinky
Compiling repos/apache-mynewt-core/hw/hal/src/hal_flash.c
Compiling apps/blinky/src/main.c
Compiling repos/mynewt_arduino_zero/hw/mcu/atmel/samd21xx/src/sam0/drivers/i2s/i2s.c
Compiling repos/mynewt_arduino_zero/hw/bsp/arduino_zero/src/hal_bsp.c
Compiling repos/mynewt_arduino_zero/hw/mcu/atmel/samd21xx/src/sam0/drivers/i2s/i2s_callback.c
Compiling repos/mynewt_arduino_zero/hw/mcu/atmel/samd21xx/src/sam0/drivers/nvm/nvm.c

     ...

Archiving sys_mfg.a
Archiving sys_sysinit.a
Archiving util_mem.a
Linking ~/dev/myproj/bin/targets/arduino_blinky/app/apps/blinky/blinky.elf
Target successfully built: targets/arduino_blinky
Connect to the Board
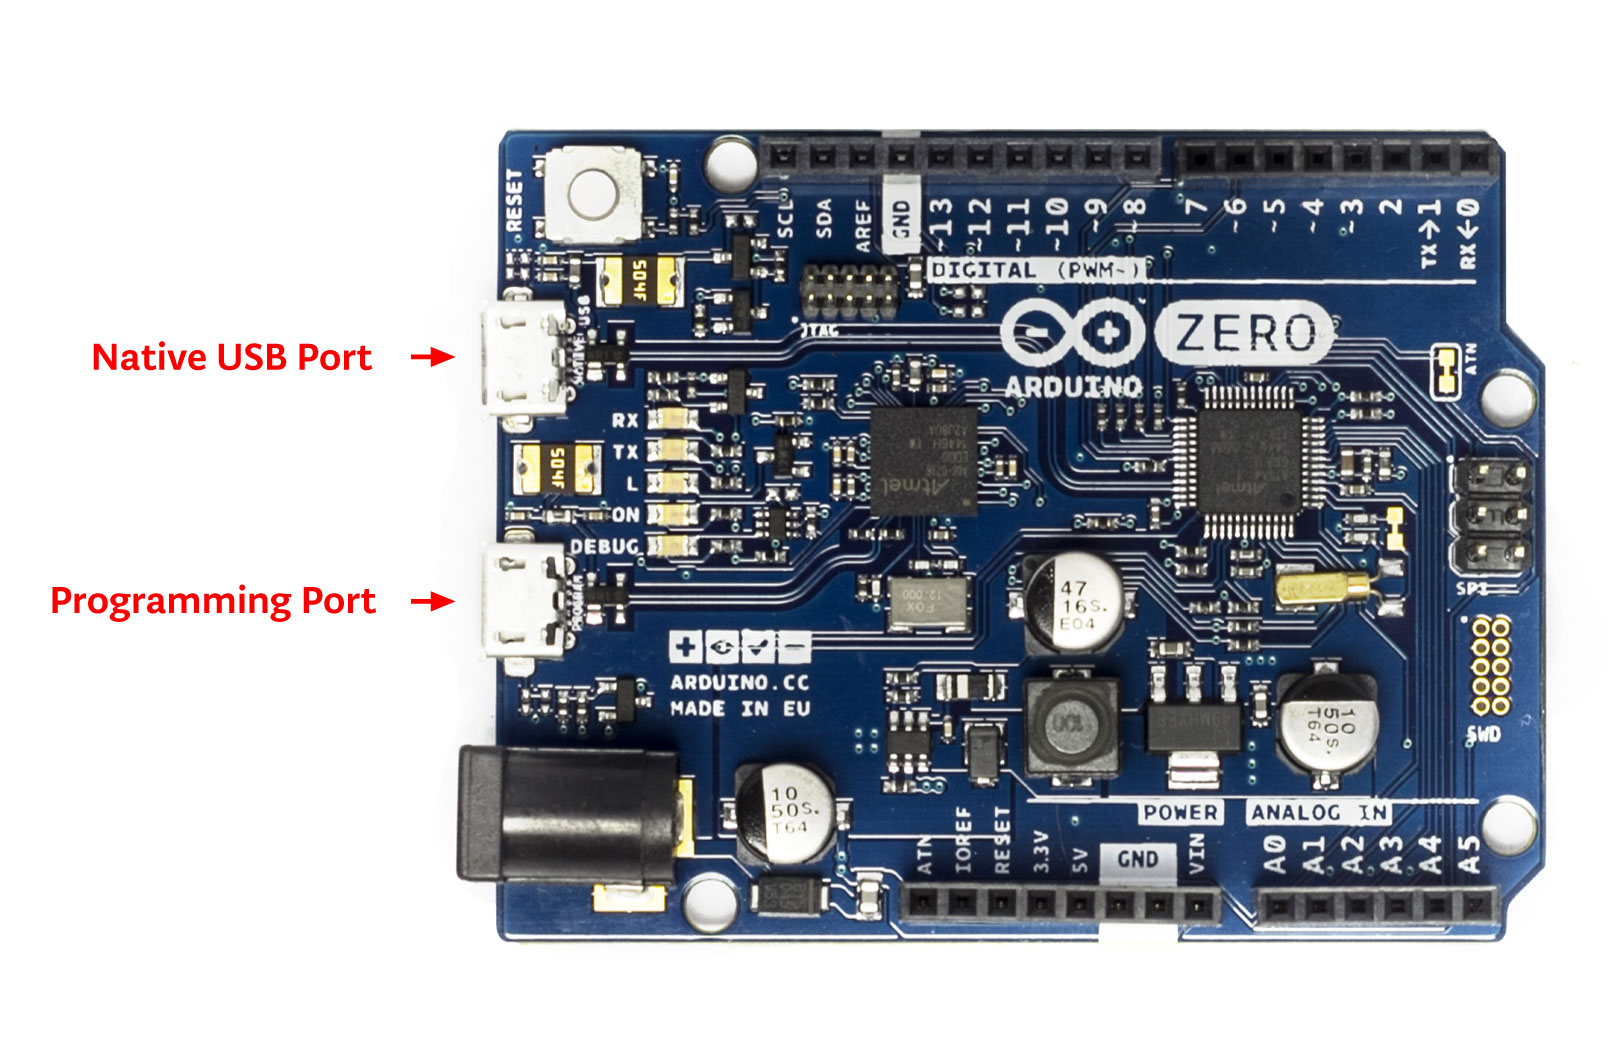
Connect your computer to the Arduino Zero (from now on we’ll call this the target) with a Micro-USB cable through the Programming Port as shown below. Mynewt will load the image onto the board and debug the target through this port. You should see a green LED come on that indicates the board has power.
No external debugger is required. The Arduino Zero comes with an internal debugger that can be accessed by Mynewt.
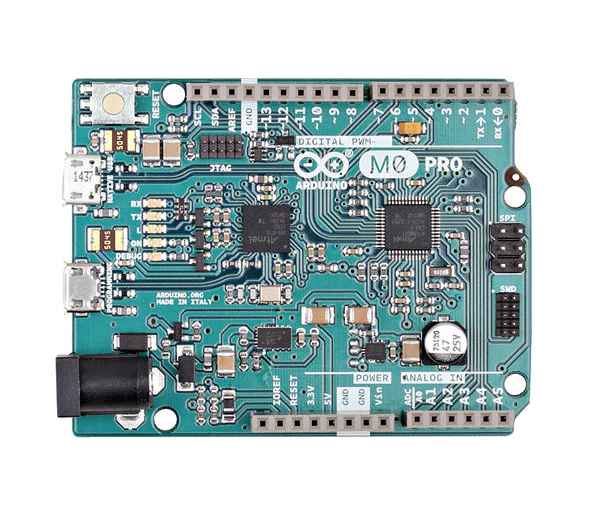
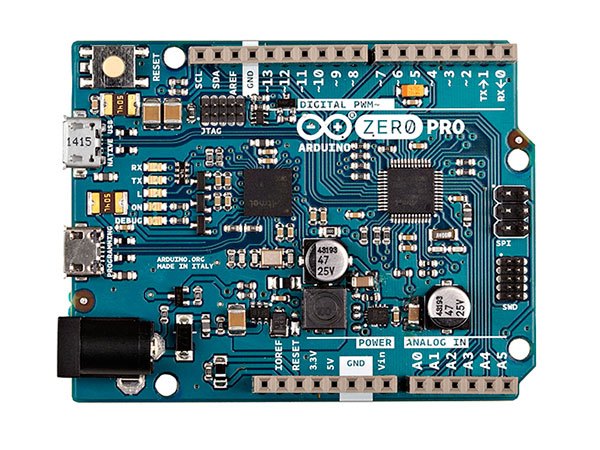
The images below show the Arduino Zero Programming Port.
Load the Bootloader onto the Board
Run the newt load arduino_boot command to load the bootloader onto
the board:
$ newt load arduino_boot
Loading bootloader
$
The bootloader is loaded onto your board succesfully when the
newt load command returns to the command prompt after the
Loading bootloader status message. You can proceed to load and run
your Blinky application image (See Run the Blinky Application).
If the newt load command outputs the following error messages, you
will need to erase the board.
$ newt load arduino_boot -v
Loading bootloader
Error: Downloading ~/dev/myproj/bin/targets/arduino_boot/boot/mynewt/mynewt.elf.bin to 0x0
Open On-Chip Debugger 0.9.0 (2015-11-15-05:39)
Licensed under GNU GPL v2
For bug reports, read
    http://openocd.org/doc/doxygen/bugs.html
Info : only one transport option; autoselect 'swd'
adapter speed: 500 kHz
adapter_nsrst_delay: 100
cortex_m reset_config sysresetreq
Info : CMSIS-DAP: SWD  Supported
Info : CMSIS-DAP: JTAG Supported
Info : CMSIS-DAP: Interface Initialised (SWD)
Info : CMSIS-DAP: FW Version = 01.1F.0118
Info : SWCLK/TCK = 1 SWDIO/TMS = 1 TDI = 1 TDO = 1 nTRST = 0 nRESET = 1
Info : CMSIS-DAP: Interface ready
Info : clock speed 500 kHz
Info : SWD IDCODE 0x0bc11477
Info : at91samd21g18.cpu: hardware has 4 breakpoints, 2 watchpoints
Error: Target not halted
To erase your board, start a debug session and enter the highlighted
commands at the (gdb) prompts:
Note: On Windows, openocd and gdb are started in separate Windows Command Prompt terminals, and the terminals are automatically closed when you quit gdb. In addition, the output of openocd is logged to the openocd.log file in your project’s base directory instead of the terminal.
$ newt debug arduino_blinky
(gdb) mon at91samd chip-erase
chip erased
chip erased
(gdb) x/32wx 0
0x0:    0xffffffff  0xffffffff  0xffffffff  0xffffffff
0x10:   0xffffffff  0xffffffff  0xffffffff  0xffffffff
0x20:   0xffffffff  0xffffffff  0xffffffff  0xffffffff
0x30:   0xffffffff  0xffffffff  0xffffffff  0xffffffff
0x40:   0xffffffff  0xffffffff  0xffffffff  0xffffffff
0x50:   0xffffffff  0xffffffff  0xffffffff  0xffffffff
0x60:   0xffffffff  0xffffffff  0xffffffff  0xffffffff
0x70:   0xffffffff  0xffffffff  0xffffffff  0xffffffff
(gdb) q
Run the newt load arduino_boot command again after erasing the
board.
Warning
Reminder if you are using Docker: When working with actual hardware,
remember that each board has an ID. If you swap boards and do not
refresh the USB Device Filter on the VirtualBox UI, the ID might be
stale and the Docker instance may not be able to see the board
correctly. For example, you may see an error message like
Error: unable to find CMSIS-DAP device when you try to load or run
an image on the board. In that case, you need to click on the USB link
in VirtualBox UI, remove the existing USB Device Filter (e.g. “Atmel
Corp. EDBG CMSIS-DAP[0101]”) by clicking on the “Removes selected USB
filter” button, and add a new filter by clicking on the “Adds new USB
filter” button.
Run the Blinky Application
After you load the bootloader successfully onto your board, you can load and run the Blinky application.
Run the newt run arduino_blinky 1.0.0 command to build the
arduino_blinky target (if necessary), create an image with version
1.0.0, load the image onto the board, and start a debugger session.
Note The output of the debug session below is for Mac OS and Linux platforms. On Windows, openocd and gdb are started in separate Windows Command Prompt terminals. The output of openocd is logged to the openocd.log file in your project’s base directory and not to the terminal. The openocd and gdb terminals will close automatically when you quit gdb.
$ newt run arduino_blinky 1.0.0
App image succesfully generated: ~/dev/myproj/bin/targets/arduino_blinky/app/apps/blinky/blinky.img
Loading app image into slot 1
[~/dev/myproj/repos/mynewt_arduino_zero/hw/bsp/arduino_zero/arduino_zero_debug.sh ~/dev/myproj/repos/mynewt_arduino_zero/hw/bsp/arduino_zero ~/dev/myproj/bin/targets/arduino_blinky/app/apps/blinky/blinky]
Open On-Chip Debugger 0.9.0 (2015-11-15-13:10)
Licensed under GNU GPL v2
For bug reports, read
http://openocd.org/doc/doxygen/bugs.html
Info : only one transport option; autoselect 'swd'
adapter speed: 500 kHz
adapter_nsrst_delay: 100
cortex_m reset_config sysresetreq
Info : CMSIS-DAP: SWD  Supported
Info : CMSIS-DAP: JTAG Supported
Info : CMSIS-DAP: Interface Initialised (SWD)
Info : CMSIS-DAP: FW Version = 01.1F.0118
Info : SWCLK/TCK = 1 SWDIO/TMS = 1 TDI = 1 TDO = 1 nTRST = 0 nRESET = 1
Info : CMSIS-DAP: Interface ready
Info : clock speed 500 kHz
Info : SWD IDCODE 0x0bc11477
Info : at91samd21g18.cpu: hardware has 4 breakpoints, 2 watchpoints
target state: halted
target halted due to debug-request, current mode: Thread
xPSR: 0x21000000 pc: 0x0000fca6 psp: 0x20002408
GNU gdb (GNU Tools for ARM Embedded Processors) 7.8.0.20150604-cvs
Copyright (C) 2014 Free Software Foundation, Inc.
License GPLv3+: GNU GPL version 3 or later <http://gnu.org/licenses/gpl.html>
This is free software: you are free to change and redistribute it.
There is NO WARRANTY, to the extent permitted by law.  Type "show copying"
and "show warranty" for details.
This GDB was configured as "--host=x86_64-apple-darwin10 --target=arm-none-eabi".
Type "show configuration" for configuration details.
For bug reporting instructions, please see:
<http://www.gnu.org/software/gdb/bugs/>.
Find the GDB manual and other documentation resources online at:
<http://www.gnu.org/software/gdb/documentation/>.
For help, type "help".
Type "apropos word" to search for commands related to "word"...
Reading symbols from ~/dev/myproj/bin/targets/arduino_blinky/app/apps/blinky/blinky.elf...(no debugging symbols found)...done.
Info : accepting 'gdb' connection on tcp/3333
Info : SAMD MCU: SAMD21G18A (256KB Flash, 32KB RAM)
0x0000fca6 in os_tick_idle ()
target state: halted
target halted due to debug-request, current mode: Thread
xPSR: 0x21000000 pc: 0x000000b8 msp: 0x20008000
target state: halted
target halted due to debug-request, current mode: Thread
xPSR: 0x21000000 pc: 0x000000b8 msp: 0x20008000
(gdb) r
The "remote" target does not support "run".  Try "help target" or "continue".
(gdb) c
Continuing.
NOTE: The 1.0.0 is the version number to assign to the image. You may assign an arbitrary version number. If you are not providing remote upgrade, and are just developing locally, you can provide 1.0.0 for every image version.
If you want the image to run without the debugger connected, simply quit the debugger and restart the board. The image you programmed will come and run on the Arduino on next boot!
You should see the LED blink!