Developing an Application for an Onboard Sensor
This tutorial shows you how to develop a simple application for an onboard sensor. The Mynewt sensor framework enables you to easily and quickly develop Mynewt sensor applications. We assume that you have completed the Enabling an Off-Board Sensor in an Existing Application Tutorial and are familiar with the sensor framework and sensor shell command.
This tutorial shows you how to:
Develop an application for the Nordic Thingy LIS2DH12 accelerometer onboard sensor with the sensor framework
sensorshell command enabled to view sensor data.Extend the application to use the sensor framework API to read the sensor data and output the data to the Mynewt console.
Prerequisites
Meet the prerequisites listed in the Sensor Tutorials Overview
Have a Nordic Thingy.
J-Link 9 pin Cortex-M Adapter that allows JTAG, SWD and SWO connections between J-Link and Cortex M based target hardware systems.
Install the Segger JLINK Software and documentation pack.
Complete the Enabling an Off-Board Sensor in an Existing Application Tutorial
Developing a Sensor Enabled Application with Shell Support
We first develop a simple application with the LIS2DH12 onboard sensor
on the Nordic Thingy and the sensor shell command enabled.
Step 1: Creating a New App Package
We name the new app package my_sensor_app. From your project base
directory, run the newt pkg new command to create a new app package.
This tutorial uses ~/dev/myproj for the project.
$ cd ~/dev/myproj
$ newt pkg new -t app apps/my_sensor_app
Download package template for package type app.
Package successfuly installed into ~/dev/myproj/apps/my_sensor_app
The newt tool creates a skeleton my_sensor_app package directory in
the ~/dev/myproj/apps/ directory. Go to the my_sensor_app
directory to update the package pkg.yml and source files.
$ cd apps/my_sensor_app
Step 2: Adding the Package Dependencies
The my_sensor_app package requires the sensor framework,
hw/sensor, package as a package dependency. Note that the BSP
creates the sensor devices for the onboard sensors, so the
hw/sensor/creator package that creates off-board sensor is not
needed.
Add the highlighted line to the pkg.yml file to add the
hw/sensor package as package dependency:
 pkg.deps:
     - "@apache-mynewt-core/kernel/os"
     - "@apache-mynewt-core/sys/console/full"
     - "@apache-mynewt-core/sys/log/full"
     - "@apache-mynewt-core/sys/stats/full"
     - "@apache-mynewt-core/hw/sensor"
Step 3: Using the Skeleton main.c File
The newt tool creates a skeleton main.c file in the
my_sensor_app/src directory. The skeleton main() code shown is
all you need to build an application that only uses the sensor shell
command to read sensor data. You do not need to make any changes to the
file. The sensor framework implements the sensor shell command and
the shell package processes shell command events from the OS default
event queue.
int
main(int argc, char **argv)
{
    /* Perform some extra setup if we're running in the simulator. */
#ifdef ARCH_sim
    mcu_sim_parse_args(argc, argv);
#endif

    /* Initialize all packages. */
    sysinit();

    /* As the last thing, process events from default event queue. */
    while (1) {
        os_eventq_run(os_eventq_dflt_get());
    }

    return 0;
}
Step 4: Creating the Target for the my_sensor_app Application
You create a target for the my_sensor_app to run on the Nordic Thingy. The following syscfg settings must be set:
I2C_0=1: Enables the I2C interface 0 for the nRF52 Thingy BSP HAL setting to communicate with the onboard sensor.LIS2DH12_ONB=1: Enables the lis2dh12 onboard sensor support in the nRF52 Thingy BSP.A BSP with onboard sensors defines a syscfg setting for each onboard sensor it supports and uses the naming convention
<SENSORNAME>_ONB. The<SENSORNAME>_ONBsetting specifies whether the sensor named SENSORNAME is enabled. The setting is disabled by default. The BSP includes the sensor device driver packagehw/drivers/sensors/<sensorname>and creates and configures the onboard sensor named SENSORNAME when the<SENSORNAME>_ONBsetting is enabled by the application.SHELL_TASK=1: Enables the shell task for the shell command support. Note that thehw/sensorpackage enables theSENSOR_CLIsetting by default.SENSOR_OIC=0: Disables the OIC sensor server support in the sensor framework.CONSOLE_RTT=1: Enables console communication via the SEGGER RTT. The nRF52 Thingy does not have a UART so we use the RTT for the console.CONSOLE_UART=0: Disables the console communication via a UART.
Note: The lis2dh12 sensor device driver package,
/hw/driver/sensors/lis2dh12, currently does not support a shell
command to view information on the device.
1. Run the following newt commands to create the target and set the application and BSP.
$ newt target create thingy_my_sensor
Target targets/thingy_my_sensor successfully created
$ newt target set thingy_my_sensor bsp=@apache-mynewt-core/hw/bsp/nrf52-thingy
Target targets/thingy_my_sensor successfully set target.bsp to @apache-mynewt-core/hw/bsp/nrf52-thingy
$ newt target set thingy_my_sensor app=apps/my_sensor_app
Target targets/thingy_my_sensor successfully set target.app to apps/my_sensor_app
$ newt target set thingy_my_sensor build_profile=debug
Target targets/thingy_my_sensor successfully set target.build_profile to debug
2. Run the following newt target set command to set the syscfg
settings:
$ newt target set thingy_my_sensor syscfg=I2C_0=1:LIS2DH12_ONB=1:SHELL_TASK=1:CONSOLE_RTT=1:CONSOLE_UART=0:SENSOR_OIC=0
Target targets/thingy_my_sensor successfully set target.syscfg to I2C_0=1:LIS2DH12_ONB=1:SHELL_TASK=1:CONSOLE_RTT=1:CONSOLE_UART=0:SENSOR_OIC=0
Step 5: Creating and Building the Bootloader Target
Create a target for the bootloader for the nRF52 Thingy. We name the
target thingy_boot.
Run the following
newt targetcommands to create the target:
$ newt target create thingy_boot
Target targets/thingy_boot successfully created
$ newt target set thingy_boot bsp=@apache-mynewt-core/hw/bsp/nrf52-thingy
Target targets/thingy_boot successfully set target.bsp to @apache-mynewt-core/hw/bsp/nrf52-thingy
$ newt target set thingy_boot app=@mcuboot/boot/mynewt
Target targets/thingy_boot successfully set target.app to @mcuboot/boot/mynewt
$ newt target set thingy_boot build_profile=optimized
Target targets/thingy_boot successfully set target.build_profile to optimized
Run the
newt buildcommand to build the bootloader target:
$ newt build thingy_boot
Building target targets/thingy_boot

       ...

Archiving thingy_boot-sysinit-app.a
Archiving util_mem.a
Linking ~/dev/myproj/bin/targets/thingy_boot/app/boot/mynewt/mynewt.elf
Target successfully built: targets/thingy_boot
Step 6: Connecting the Thingy to your Computer
Perform the following steps to connect the Thingy to your computer:
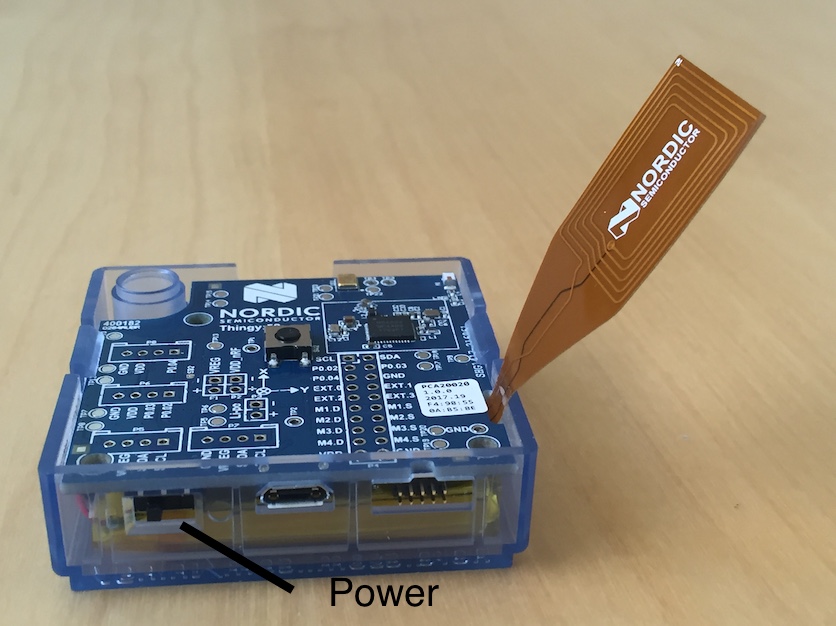
Move the power switch to the left to power ON the Thingy:
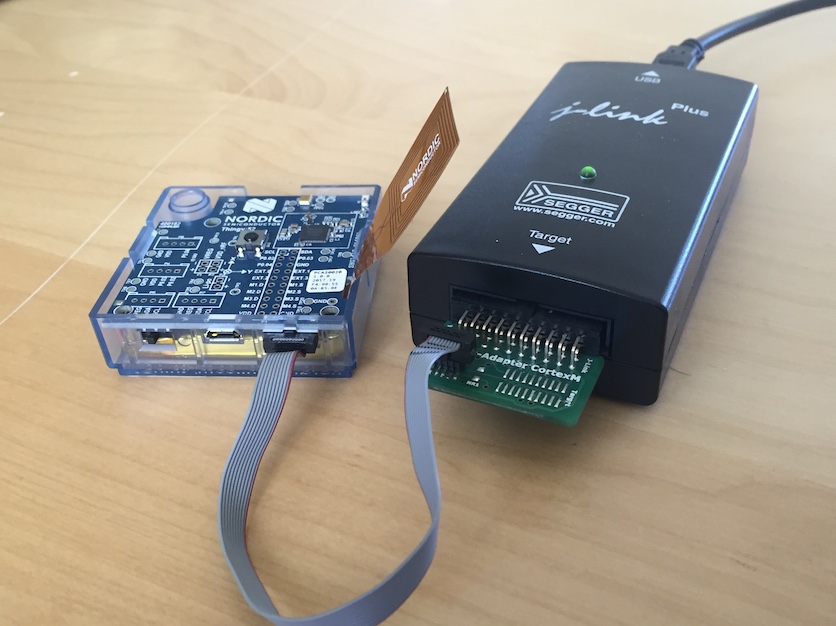
2. Connect the debug probe to the JTAG port on the board using the Jlink 9-pin adapter and cable, and connect the probe to your computer.
Step 7: Loading the Image and Connecting to the Console via RTT
To run the application, you need to load the bootloader on to the device, load the application image, and start a GDB debug process for RTT to attach to.
Run the
newt loadcommand to load the bootloader:
$ newt load thingy_boot
Loading bootloader
2. Run the newt run command to build and create an image for the
my_sensor_app, load the image, and start a GDB process to debug the
application:
$ newt run thingy_my_sensor 1.0.0
Assembling repos/apache-mynewt-core/hw/bsp/nrf52-thingy/src/arch/cortex_m4/gcc_startup_nrf52_split.s
Compiling repos/apache-mynewt-core/hw/cmsis-core/src/cmsis_nvic.c
Assembling repos/apache-mynewt-core/hw/bsp/nrf52-thingy/src/arch/cortex_m4/gcc_startup_nrf52.s
Compiling repos/apache-mynewt-core/encoding/base64/src/hex.c
Compiling apps/my_sensor_app/src/main.c

    ...

Archiving thingy_my_sensor-sysinit-app.a
Archiving time_datetime.a
Archiving util_cbmem.a
Archiving util_crc.a
Archiving util_mem.a
Archiving util_parse.a
Linking ~/dev/myproj/bin/targets/thingy_my_sensor/app/apps/my_sensor_app/my_sensor_app.elf
App image succesfully generated: ~/dev/myproj/bin/targets/thingy_my_sensor/app/apps/my_sensor_app/my_sensor_app.img
Loading app image into slot 1
[~/dev/myproj/repos/apache-mynewt-core/hw/bsp/nrf52-thingy/nrf52-thingy_debug.sh ~/dev/myproj/repos/apache-mynewt-core/hw/bsp/nrf52-thingy ~/dev/myproj/bin/targets/thingy_my_sensor/app/apps/my_sensor_app/my_sensor_app]
Debugging ~/dev/myproj/bin/targets/thingy_my_sensor/app/apps/my_sensor_app/my_sensor_app.elf
GNU gdb (GNU Tools for ARM Embedded Processors) 7.8.0.20150604-cvs
Copyright (C) 2014 Free Software Foundation, Inc.
License GPLv3+: GNU GPL version 3 or later <http://gnu.org/licenses/gpl.html>
This is free software: you are free to change and redistribute it.
There is NO WARRANTY, to the extent permitted by law.  Type "show copying"
and "show warranty" for details.
This GDB was configured as "--host=x86_64-apple-darwin10 --target=arm-none-eabi".
Type "show configuration" for configuration details.
For bug reporting instructions, please see:
<http://www.gnu.org/software/gdb/bugs/>.
Find the GDB manual and other documentation resources online at:
<http://www.gnu.org/software/gdb/documentation/>.
For help, type "help".
Type "apropos word" to search for commands related to "word"...
Reading symbols from ~/dev/myproj/bin/targets/thingy_my_sensor/app/apps/my_sensor_app/my_sensor_app.elf...done.
os_tick_idle (ticks=24)
    at repos/apache-mynewt-core/hw/mcu/nordic/nrf52xxx/src/hal_os_tick.c:204
204     if (ticks > 0) {
Resetting target
0x000000dc in ?? ()
(gdb)
Enter
c <return>in the (gdb) prompt to continue.
4. Run the following telnet command to connect to the Mynewt console via RTT and enter <return> to get the shell prompt after you are connected.
$ telnet localhost 19021
Trying ::1...
telnet: connect to address ::1: Connection refused
Trying 127.0.0.1...
Connected to localhost.
Escape character is '^]'.
SEGGER J-Link V6.14h - Real time terminal output
SEGGER J-Link ARM V10.0, SN=600000268
Process: JLinkGDBServer

011468 compat>
Step 8: Viewing the list of Sensors and Sensor Data
1. Enter sensor list to see the sensors that are registered with
the sensor manager. You should see the lis2dh12_0 sensor. This
sensor is only configured for the accelerometer (0x1).
011468 compat> sensor list
sensor list
029706 sensor dev = lis2dh12_0, configured type = 0x1
029707 compat>
2. Enter the sensor read command to read some data samples from the
accelerometer:
029707 compat> sensor read lis2dh12_0 0x1 -n 5
sensor read lis2dh12_0 0x1 -n 5
042537 ts: [ secs: 331 usecs: 102682 cputime: 331436945 ]
042537 x = 9.806650176 y = 58.839900992 z = -9894.910156
042537 ts: [ secs: 331 usecs: 104832 cputime: 331439095 ]
042537 x = 19.613300352 y = 98.066497804 z = -9924.330078
042537 ts: [ secs: 331 usecs: 106988 cputime: 331441251 ]
042537 x = 9.806650176 y = 49.033248902 z = -9904.716796
042538 ts: [ secs: 331 usecs: 109137 cputime: 331443400 ]
042538 x = 9.806650176 y = 29.419950496 z = -9904.716796
042538 ts: [ secs: 331 usecs: 111288 cputime: 331445551 ]
042538 x = 58.839900992 y = 0.000000000 z = -9816.457031
042538 compat>
Extending the Application to Use the Sensor API to Read Sensor Data
As this tutorial demonstrates so far, the Mynewt sensor framework
enables you to easily and quickly develop an application with a sensor
and view the sensor data from the sensor shell command. We now
extend the application to use the sensor API to read the sensor data.
There are two sensor functions that you can use to read data from a sensor device:
sensor_register_listener(): This function allows you to register a listener for a sensor device. You specify a bit mask of the types of sensor data to listen for and a callback to call when data is read from the sensor device. The listener callback is called whenever thesensor_read()function reads data for a sensor type from a sensor device that the listener is listening for.The sensor framework supports polling of sensor devices. For a sensor device that has a polling rate configured, the sensor framework poller reads sensor data for all the configured sensor types from the sensor device at each polling interval and calls the registered listener callbacks with the sensor data.
sensor_read(): This function reads sensor data from a sensor device and calls the specified user callback to receive the sensor data. You specify a bit mask of the types of sensor data to read from a sensor device and a callback. This callback is called for each sensor type you specify to read.
We first extend the application to a register a sensor listener to
demonstrate how to use the sensor framework polling support. We then
extend the application to use the sensor_read() function instead of
a listener. An application may not need to poll sensors. For example, an
application that processes remote requests for sensor data might only
read the sensor data when it receives a request.
Step 1: Modifying main.c to Add a Sensor Listener
Add the following code to the my_sensor_app/src/main.c file:
Add the highlighted include files:
 #include "sysinit/sysinit.h"
 #include "os/os.h"

 #include <defs/error.h>
 #include <sensor/sensor.h>
 #include <sensor/accel.h>
 #include <console/console.h>
2. Add the struct sensor *my_sensor. This is the handle for the
sensor that the sensor API uses to perform operations on the sensor. We
set this variable when we lookup the sensor.
static struct sensor *my_sensor;
3. Declare and initialize a sensor listener. You specify a bit mask for
the sensor types to listen for, the callback function, and an opaque
argument to pass to the callback. You initialize the type to
SENSOR_TYPE_ACCELEROMETER, the listener callback to the
read_accelerometer() function, and the callback opaque argument to
the LISTENER_CB value.
Note: We define LISTENER_CB and READ_CB values because we also use
the read_accelerometer() function as the callback for the
sensor_read() function later in the tutorial. The LISTENER_CB or
the READ_CB value is passed to the read_accelerometer() function to
indicate whether it is invoked as a listener or a sensor_read()
callback.
#define LISTENER_CB 1
#define READ_CB 2

static int read_accelerometer(struct sensor* sensor, void *arg, void *databuf, sensor_type_t type);

static struct sensor_listener listener = {
   .sl_sensor_type = SENSOR_TYPE_ACCELEROMETER,
   .sl_func = read_accelerometer,
   .sl_arg = (void *)LISTENER_CB,
};
4. Add the code for the read_accelerometer() function. The sensor
data is stored in the databuf and type specifies the type of
sensor data.
static int
read_accelerometer(struct sensor* sensor, void *arg, void *databuf, sensor_type_t type)
{

    char tmpstr[13];
    struct sensor_accel_data *sad;

    if (!databuf) {
        return SYS_EINVAL;

    }
    sad = (struct sensor_accel_data *)databuf;

    if (!sad->sad_x_is_valid ||
        !sad->sad_y_is_valid ||
        !sad->sad_z_is_valid) {

        return SYS_EINVAL;
    }

    console_printf("%s: [ secs: %ld usecs: %d cputime: %u ]\n",
                   ((int)arg == LISTENER_CB) ? "LISTENER_CB" : "READ_CB",
                   (long int)sensor->s_sts.st_ostv.tv_sec,
                   (int)sensor->s_sts.st_ostv.tv_usec,
                   (unsigned int)sensor->s_sts.st_cputime);

    console_printf("x = %s ", sensor_ftostr(sad->sad_x, tmpstr, 13));
    console_printf("y = %s ", sensor_ftostr(sad->sad_y, tmpstr, 13));
    console_printf("z = %s\n\n", sensor_ftostr(sad->sad_z, tmpstr, 13));
    return 0;
}
5. Set the poll rate for the sensor to two seconds. The
sensor_set_poll_rate_ms() function sets the poll rate for a named
sensor.
Note: You set the poll rate for a sensor programmatically and must
set the poll rate to a non zero value in order for the sensor manager to
poll the sensor. You may set a different poll rate for each sensor. The
sensor framework also defines a SENSOR_MGR_WAKEUP_RATE syscfg
setting that specifies the default rate that the sensor manager polls.
The sensor manager uses the poll rate for a sesnor if a sensor is
configured to poll more frequently than the SENSOR_MGR_WAKEUP_RATE
setting value.
 #define MY_SENSOR_DEVICE "lis2dh12_0"
 #define MY_SENSOR_POLL_TIME 2000


 int
 main(int argc, char **argv)
 {
     int rc;

     ...

     /* Initialize all packages. */
     sysinit();

     rc = sensor_set_poll_rate_ms(MY_SENSOR_DEVICE, MY_SENSOR_POLL_TIME);
     assert(rc == 0);


     /* As the last thing, process events from default event queue. */
     while (1) {
         os_eventq_run(os_eventq_dflt_get());
     }

     return 0;

 }
6. Look up the sensor by name to get the handle for the sensor and register a listener for the sensor.
 int
 main(int argc, char **argv)
 {

     ...

     rc = sensor_set_poll_rate_ms(MY_SENSOR_DEVICE, MY_SENSOR_POLL_TIME);
     assert(rc == 0);

     my_sensor = sensor_mgr_find_next_bydevname(MY_SENSOR_DEVICE, NULL);
     assert(my_sensor != NULL);
     rc = sensor_register_listener(my_sensor, &listener);
     assert(rc == 0);

     /* As the last thing, process events from default event queue. */
     while (1) {
         os_eventq_run(os_eventq_dflt_get());
     }

     return 0;

 }
Step 2: Rebuilding the Application and Connecting to Console
1. Run the newt run command to rebuild the application, create a
new image, load the image, and start a GDB process:
$ newt run thingy_my_sensor 2.0.0
Compiling apps/my_sensor_app/src/main.c
Archiving apps_my_sensor_app.a
Linking ~/dev/myproj/bin/targets/thingy_my_sensor/app/apps/my_sensor_app/my_sensor_app.elf
App image succesfully generated: ~/dev/myproj/bin/targets/thingy_my_sensor/app/apps/my_sensor_app/my_sensor_app.img
Loading app image into slot 1
[~/dev/myproj/repos/apache-mynewt-core/hw/bsp/nrf52-thingy/nrf52-thingy_debug.sh ~/dev/myproj/repos/apache-mynewt-core/hw/bsp/nrf52-thingy ~/dev/myproj/bin/targets/thingy_my_sensor/app/apps/my_sensor_app/my_sensor_app]
Debugging ~/dev/myproj/bin/targets/thingy_my_sensor/app/apps/my_sensor_app/my_sensor_app.elf
GNU gdb (GNU Tools for ARM Embedded Processors) 7.8.0.20150604-cvs

    ...

Reading symbols from ~/dev/myproj/bin/targets/thingy_my_sensor/app/apps/my_sensor_app/my_sensor_app.elf...done.
os_tick_idle (ticks=12)
    at repos/apache-mynewt-core/hw/mcu/nordic/nrf52xxx/src/hal_os_tick.c:204
204     if (ticks > 0) {
Resetting target
0x000000dc in ?? ()
(gdb) c
Continuing.
Connect to the console via RTT:
$ telnet localhost 19021

 Connected to localhost.
 Escape character is '^]'.
 SEGGER J-Link V6.14h - Real time terminal output
 J-Link OB-SAM3U128-V2-NordicSemi compiled Mar  2 2017 12:22:13 V1.0, SN=682562963
 Process: JLinkGDBServer
 000003 LISTENER_CB: [ secs: 0 usecs: 23407 cputime: 331783 ]
 000003 x = 117.67980192 y = -19.61330035 z = -9885.103515

 000259 LISTENER_CB: [ secs: 2 usecs: 21190 cputime: 2327645 ]
 000259 x = 117.67980192 y = -9.806650176 z = -9914.523437

 000515 LISTENER_CB: [ secs: 4 usecs: 17032 cputime: 4323487 ]
 000515 x = 78.453201280 y = 0.000000000 z = -9924.330078

 000771 LISTENER_CB: [ secs: 6 usecs: 13131 cputime: 6319586 ]
 000771 x = 117.67980192 y = -19.61330035 z = -9914.523437

 001027 LISTENER_CB: [ secs: 8 usecs: 8810 cputime: 8315265 ]
 001027 x = 127.48645020 y = 0.000000000 z = -9924.330078

 001283 LISTENER_CB: [ secs: 10 usecs: 4964 cputime: 10311419 ]
 001283 x = 58.839900992 y = -9.806650176 z = -9885.103515
You should see the accelerometer sensor data output from the listener callback.
Step 3: Modifying main.c to Use sensor_read() Instead of a Listener
Lets extend the application to use the sensor_read() function
instead of a listener. We setup an OS callout to call the
sensor_read() function for illustration purposes. A real application
will most likely read the sensor data when it gets a request or some
other event.
1. Add an OS callout and initialize an OS timer to fire every 5
seconds. The timer callback calls the sensor_read() function to read
the sensor data. The read_accelerometer() callback is called when
the sensor data is read. The READ_CB value is passed to the
read_accelerometer() function and indicates that the callback is
from the sensor_read() function and not from the listener.
/*
 * Event callback function for timer events. The callback reads the sensor data
 */

#define READ_SENSOR_INTERVAL (5 * OS_TICKS_PER_SEC)

static struct os_callout sensor_callout;

static void
timer_ev_cb(struct os_event *ev)
{


    assert(ev != NULL);

    /*
     * Read the accelerometer sensor.  Pass the READ_CB value for the callback opaque
     * arg to indicate that it is the sensor_read() callback.
     */
    sensor_read(my_sensor, SENSOR_TYPE_ACCELEROMETER, read_accelerometer,
                 (void *)READ_CB, OS_TIMEOUT_NEVER);
    os_callout_reset(&sensor_callout, READ_SENSOR_INTERVAL);
    return;
}


static void
init_timer(void)
{
    /*
     * Initialize the callout for a timer event.
     */
    os_callout_init(&sensor_callout, os_eventq_dflt_get(),
                    timer_ev_cb, NULL);

    os_callout_reset(&sensor_callout, READ_SENSOR_INTERVAL);
    return;
}
2. Remove the listener registration and call the init_timer()
function in main(). You can delete the
sensor_register_listener() function call, but we call the
sensor_unregister_listener() function to illustrate how to use this
function.
 int
 main(int argc, char **argv)
 {
     ...

     assert(my_sensor != NULL);
     rc = sensor_register_listener(my_sensor, &listener);
     assert(rc == 0);

     rc = sensor_unregister_listener(my_sensor, &listener);
     assert(rc == 0);

     init_timer();

     /* As the last thing, process events from default event queue. */
     while (1) {
         os_eventq_run(os_eventq_dflt_get());
     }

     return 0;
 }
Step 4: Rebuilding the Application and Connecting to Console
1. Run the newt run command to rebuild the application, create an new
image, and start a GDB process:
$ newt run thingy_my_sensor 3.0.0
Compiling apps/my_sensor_app/src/main.c
Archiving apps_my_sensor_app.a
Linking ~/dev/myproj/bin/targets/thingy_my_sensor/app/apps/my_sensor_app/my_sensor_app.elf
App image succesfully generated: ~/dev/myproj/bin/targets/thingy_my_sensor/app/apps/my_sensor_app/my_sensor_app.img
Loading app image into slot 1
[~/dev/myproj/repos/apache-mynewt-core/hw/bsp/nrf52-thingy/nrf52-thingy_debug.sh ~/dev/myproj/repos/apache-mynewt-core/hw/bsp/nrf52-thingy ~/dev/myproj/bin/targets/thingy_my_sensor/app/apps/my_sensor_app/my_sensor_app]
Debugging ~/dev/myproj/bin/targets/thingy_my_sensor/app/apps/my_sensor_app/my_sensor_app.elf
GNU gdb (GNU Tools for ARM Embedded Processors) 7.8.0.20150604-cvs

     ...

Reading symbols from ~/dev/myproj/bin/targets/thingy_my_sensor/app/apps/my_sensor_app/my_sensor_app.elf...done.
os_tick_idle (ticks=12)
    at repos/apache-mynewt-core/hw/mcu/nordic/nrf52xxx/src/hal_os_tick.c:204
204     if (ticks > 0) {
Resetting target
0x000000dc in ?? ()
(gdb) c
Continuing.
Connect to the console via RTT:
$ telnet localhost 19021
Trying ::1...
telnet: connect to address ::1: Connection refused
Trying 127.0.0.1...
Connected to localhost.
Escape character is '^]'.
SEGGER J-Link V6.14h - Real time terminal output
J-Link OB-SAM3U128-V2-NordicSemi compiled Mar  2 2017 12:22:13 V1.0, SN=682562963
Process: JLinkGDBServer


000629 compat> READ_CB: [ secs: 5 usecs: 4088 cputime: 5295643 ]
000642 x = 98.066497804 y = 0.000000000 z = -9806.650390

001282 READ_CB: [ secs: 9 usecs: 992459 cputime: 10284014 ]
001282 x = 117.67980192 y = -39.22660064 z = -9894.910156

001922 READ_CB: [ secs: 14 usecs: 981159 cputime: 15272714 ]
001922 x = 78.453201280 y = -29.41995049 z = -9885.103515

002562 READ_CB: [ secs: 19 usecs: 970088 cputime: 20261643 ]
002562 x = 107.87315366 y = -29.41995049 z = -9885.103515
You should see the accelerometer sensor data output from the sensor read data callback.