Tasks and Priority Management
Target Platform: Arduino M0 Pro (or legacy Arduino Zero or Zero Pro, but not Arduino M0)
This lesson is designed to teach core OS concepts and strategies encountered when building applications using Mynewt. Specifically, this lesson will cover tasks, simple multitasking, and priority management running on an Arduino M0 Pro.
Prerequisites
Before starting, you should read about Mynewt in the Introduction section and complete the QuickStart guide and the Blinky tutorial. Furthermore, it may be helpful to take a peek at the task documentation for additional insights.
Equipment
You will need the following equipment:
Arduino M0 Pro (or legacy Arduino Zero or Zero Pro, but not Arduino M0)
Computer with Mynewt installed
USB to Micro USB Cable
Build Your Application
To save time, we will simply modify the Blinky application. We’ll add the Task Management code to the Blinky application. Follow the Arduino Zero Blinky tutorial to create a new project and build your bootloader and application. Finally, build and load the application to your Arduino to verify that everything is in order. Now let’s get started!
Default Main Task
During Mynewt system startup, Mynewt creates a default main task and
executes the application main() function in the context of this
task. The main task priority defaults to 127 and can be configured with
the OS_MAIN_TASK_PRIO system configuration setting.
The blinky application only has the main task. The main()
function executes an infinite loop that toggles the led and sleeps for
one second.
Create a New Task
The purpose of this section is to give an introduction to the important
aspects of tasks and how to properly initialize them. First, let’s
define a second task called work_task in main.c (located in
apps/blinky/src):
struct os_task work_task;
A task is represented by the os_task struct which will hold the task’s information (name, state, priority, etc.). A task is made up of two main elements, a task function (also known as a task handler) and a task stack.
Next, let’s take a look at what is required to initialize our new task.
Task Stack
The task stack is an array of type os_stack_t which holds the
program stack frames. Mynewt gives us the ability to set the stack size
for a task giving the application developer room to optimize memory
usage. Since we’re not short on memory, our work_stack is plenty
large for the purpose of this lesson. Notice that the elements in our
task stack are of type os_stack_t which are generally 32 bits,
making our entire stack 1024 Bytes.
#define WORK_STACK_SIZE OS_STACK_ALIGN(256)
Note: The OS_STACK_ALIGN macro is used to align the stack based on
the hardware architecture.
Task Function
A task function is essentially an infinite loop that waits for some
“event” to wake it up. In general, the task function is where the
majority of work is done by a task. Let’s write a task function for
work_task called work_task_handler():
void
work_task_handler(void *arg)
{
    struct os_task *t;

    g_led_pin = LED_BLINK_PIN;
    hal_gpio_init_out(g_led_pin, 1);

    while (1) {
        t = os_sched_get_current_task();
        assert(t->t_func == work_task_handler);
        /* Do work... */
    }
}
The task function is called when the task is initially put into the running state by the scheduler. We use an infinite loop to ensure that the task function never returns. Our assertion that the current task’s handler is the same as our task handler is for illustration purposes only and does not need to be in most task functions.
Task Priority
As a preemptive, multitasking RTOS, Mynewt decides which tasks to run based on which has a higher priority; the highest priority being 0 and the lowest 255. Thus, before initializing our task, we must choose a priority defined as a macro variable.
Let’s set the priority of work_task to 0, because everyone knows
that work is more important than blinking.
#define WORK_TASK_PRIO (0)
Initialization
To initialize a new task we use os_task_init()
which takes a number of arguments including our new task function,
stack, and priority.
Add the init_tasks() function to initialize work_task to keep
our main function clean.
int
init_tasks(void)
{
    /* … */
    os_stack_t *work_stack;
    work_stack = malloc(sizeof(os_stack_t)*WORK_STACK_SIZE);

    assert(work_stack);
    os_task_init(&work_task, "work", work_task_handler, NULL,
            WORK_TASK_PRIO, OS_WAIT_FOREVER, work_stack,
            WORK_STACK_SIZE);

    return 0;
}
Add the call to init_tasks() in main() before the while
loop:
int
main(int argc, char **argv)
{

        ...

    /* Initialize the work task */
    init_tasks();

    while (1) {
         ...
    }
}
And that’s it! Now run your application using the newt run command.
$ newt run arduino_blinky 0.0.0
When GDB appears press C then Enter to continue and … wait, why doesn’t our LED blink anymore?
Review
Before we run our new app, let’s review what we need in order to create a task. This is a general case for a new task called mytask:
1) Define a new task, task stack, and priority:
/* My Task */
struct os_task mytask
/* My Task Stack */
#define MYTASK_STACK_SIZE OS_STACK_ALIGN(256)
os_stack_t mytask_stack[MYTASK_STACK_SIZE];
/* My Task Priority */
#define MYTASK_PRIO (0)
2) Define task function:
void
mytask_handler(void *arg)
{
  while (1) {
      /* ... */
  }
}
3) Initialize the task:
os_task_init(&mytask, "mytask", mytask_handler, NULL,
            MYTASK_PRIO, OS_WAIT_FOREVER, mytask_stack,
            MYTASK_STACK_SIZE);
Task Priority, Preempting, and Context Switching
A preemptive RTOS is one in which a higher priority task that is ready to run will preempt (i.e. take the place of) the lower priority task which is running. When a lower priority task is preempted by a higher priority task, the lower priority task’s context data (stack pointer, registers, etc.) is saved and the new task is switched in.
In our example, work_task (priority 0) has a higher priority than
the main task (priority 127). Since work_task is never put into
a sleep state, it holds the processor focus on its context.
Let’s give work_task a delay and some simulated work to keep it
busy. The delay is measured in os ticks and the actual number of ticks
per second is dependent on the board. We multiply OS_TICKS_PER_SEC,
which is defined in the MCU, by the number of seconds we wish to delay.
void
work_task_handler(void *arg)
{
    struct os_task *t;

    g_led_pin = LED_BLINK_PIN;
    hal_gpio_init_out(g_led_pin, 1);

    while (1) {
        t = os_sched_get_current_t:ask();
        assert(t->t_func == work_task_handler);
        /* Do work... */
        int i;
        for(i = 0; i < 1000000; ++i) {
            /* Simulate doing a noticeable amount of work */
            hal_gpio_write(g_led_pin, 1);
        }
        os_time_delay(3 * OS_TICKS_PER_SEC);
    }
}
In order to notice the LED changing, modify the time delay in
main() to blink at a higher frequency.
os_time_delay(OS_TICKS_PER_SEC/10);
Before we run the app, let’s predict the behavior. With the newest
additions to work_task_handler(), our first action will be to sleep
for three seconds. This allows the main task, running main(), to
take over the CPU and blink to its heart’s content. After three seconds,
work_task will wake up and be made ready to run. This causes it to
preempt the main task. The LED will then remain lit for a short
period while work_task loops, then blink again for another three
seconds while work_task sleeps.
You should see that our prediction was correct!
Priority Management Considerations
When projects grow in scope, from blinking LEDs into more sophisticated applications, the number of tasks needed increases alongside complexity. It remains important, then, that each of our tasks is capable of doing its work within a reasonable amount of time.
Some tasks, such as the Shell task, execute quickly and require almost instantaneous response. Therefore, the Shell task should be given a high priority. On the other hand, tasks which may be communicating over a network, or processing data, should be given a low priority in order to not hog the CPU.
The diagram below shows the different scheduling patterns we would
expect when we set the work_task priority higher and lower than the
main task priority.
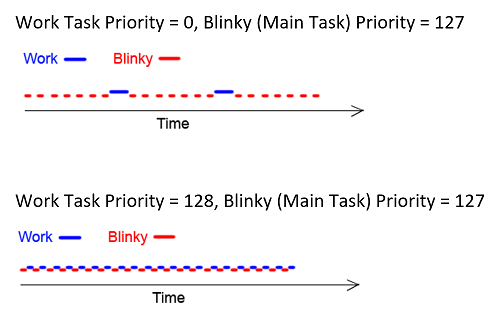
Task Scheduling
In the second case where the main task has a higher priority,
work_task runs and executes “work” when the main task sleeps,
saving us idle time compared to the first case.
Note: Defining the same priority for two tasks fires an assert in
os_task_init() and must be avoided. Priority 127 is reserved for main
task, 255 for idle task.