Using the Serial Port with Mynewt OS
Some of the projects and tutorials here will allow you to use a serial port to interact with your Mynewt project. While most modern PCs and laptops no longer have a true serial port, almost all can use their USB ports as serial ports.
This page will show you how to connect to some of the development boards we use via a serial port.
Using the USB port on the nRF52DK
The nRF52DK can communicate via a serial port directly through its USB port. By default, it uses the UART onboard, so if you need to use the UART for other purposes, consider using a USB<–>Serial converter or the Segger RTT Console instead, instructions provided below.
To see your device, check the USB devices that are connected to your computer (macOS):
$ ls -l /dev/*USB*
crw-rw-rw- 1 <user> None 117, 5 May  9 04:24 /dev/cu.usbmodem1411
crw-rw-rw- 1 <user> None 117, 5 May  9 04:24 /dev/tty.usbmodem1411
$
The /dev/cu.usbmodem#### and /dev/tty.usbmodem#### represent your device. To get console access, you can either use the screen command or Minicom:
$ minicom -D /dev/tty.usbmodem1411

Welcome to minicom 2.7

OPTIONS:
Compiled on Apr 26 2018, 13:21:44
Port /dev/tty.usbmodem1411, 11:12:13

Press Meta-Z for help on special keys
Using a USB to Serial Breakout Board
If you need to use an external USB to Serial converter, this guide will show you how to set it up. The development boards covered here are:
Nordic Semiconductor nRF52dk
Arduino M0 Pro
For this tutorial, we’ll be using the AdaFruit FT232H Breakout
Board, but almost
any similar board should work just as well. You will also need Minicom
or a similar Serial communications application. We’ll show you how to
use the screen command built in to Mac OS X, but later tutorials
will also show Minicom setup.
Setup FT232H
This is a great board because it’s so easy to set up, and it can do Serial UART, SPI, I2C and GPIO as well. There’s full documentation on the board here but we’re only covering the wiring for the Serial UART.
Start by connecting a jumper wire to Pin D0. This will be the UART Tx pin, which we’ll then connect to the Rx pin on the Development Board.
Next connect a jumper wire to pin D1. This will be the UART Rx pin, which we’ll connect to the Tx pin on the development board.
Finally connect a jumper wire to the GND pin.
It should look like this:
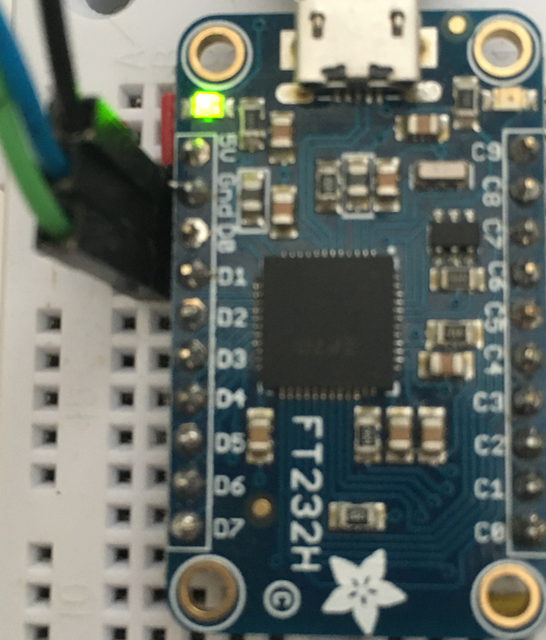
FT232H Wiring
Setup Nordic Semiconductor NRF52DK
On the NRF52DK developer kit board, the Rx pin is P0.08, so you’ll attach your jumper wire from the Tx pin (D0) of the FT232H board here.
The TX Pin is pin P0.06, so you’ll attache the jumper wire from the Rx Pin (D1) on the FT232H board here.
Finally, the GND wire should go to the GND Pin on the NRF52DK. When you’re done, your wiring should look like this:
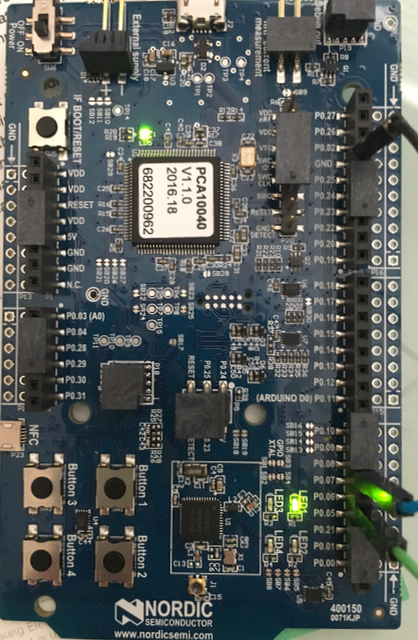
NRF52DK Wiring
Setup Arduino M0 Pro
On the Arduino M0 Pro, the Tx and Rx pins are clearly labeled as such, as is the GND pin. Just make sure you wire Rx from the FT232H to TX on the M0 Pro, and vice-versa.
Your Arduino M0 Pro should look like this:
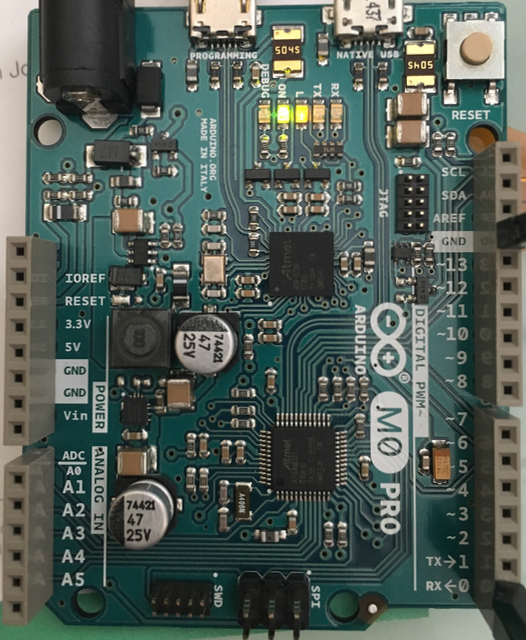
Arduino M0 Pro Wiring
Setup Serial Communications
You will need to know the serial port to connect to and use a terminal program to connect to the board.
Example for Mac OS and Linux Platforms
First check what USB devices are already connected before connecting the FT232H board to your computer. The ports are listed in the /dev directory and the format of the port name is platform dependent:
Mac OS uses the format
tty.usbserial-<some identifier>.Linux uses the format
TTYUSB<N>, whereNis a number. For example, TTYUSB2.
This example is run on a Mac OS system.
Check what USB devices are already connected:
$ ls -la /dev/*usb*
0 crw-rw-rw-  1 root  wheel   20,  63 Nov 23 11:13 /dev/cu.usbmodem401322
0 crw-rw-rw-  1 root  wheel   20,  62 Nov 23 11:13 /dev/tty.usbmodem401322
$
Plug in the FT232H board and check the ports again:
$ ls -la /dev/*usb*
0 crw-rw-rw-  1 root  wheel   20,  63 Nov 23 11:13 /dev/cu.usbmodem401322
0 crw-rw-rw-  1 root  wheel   20,  65 Nov 23 11:26 /dev/cu.usbserial-0020124
0 crw-rw-rw-  1 root  wheel   20,  62 Nov 23 11:13 /dev/tty.usbmodem401322
0 crw-rw-rw-  1 root  wheel   20,  64 Nov 23 11:26 /dev/tty.usbserial-0020124
$
The FT232H is connected to /dev/tty.usbserial-0020124 (The number
after tty.usbserial will be different on your machine.) Use the screen
command to connect to the board:
$ screen /dev/tty.usbserial-0020124 115200
To exit out of screen you’ll type control-A followed by
control-\ and you’ll be back to a terminal prompt.
You can also use minicom:
$ minicom -D /dev/tty.usbserial-0020124

Welcome to minicom 2.7

OPTIONS:
Compiled on Nov 24 2015, 16:14:21.
Port /dev/tty.usbserial-0020124, 09:57:17

Press Meta-Z for help on special keys
If there’s no Mynewt app running, or the Mynewt app doesn’t have the Shell and Console enabled, you won’t see anything there, but you can always refer back to this page from later tutorials if you need to.
Example for Windows Platforms
First check what USB devices are already connected before connecting the FT232H board to your computer. You can locate the ports from a MinGW terminal or use the Windows Device Manager.
On a MinGW terminal, the ports are listed in the /dev directory and the
format of the port name is ttyS<N> where N is a number. You must map
the port name to a Windows COM port: /dev/ttyS<N> maps to
COM<N+1>. For example, /dev/ttyS2 maps to COM3.
Check what USB devices are already connected:
$ ls -l /dev/ttyS*
crw-rw-rw- 1 <user> None 117, 5 May  9 04:24 /dev/ttyS5
$
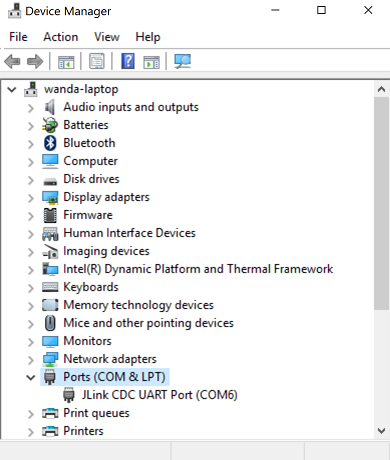
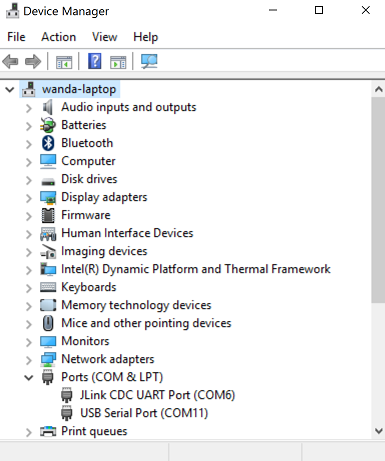
/dev/ttyS5 maps to the Windows COM6 port. You can run Windows Device Manager to confirm:
Plug in the FT232H board and check the ports again:
$ ls -l /dev/ttyS*
ls -l /dev/ttyS*
crw-rw-rw- 1 <user> None 117, 10 May  9 04:55 /dev/ttyS10
crw-rw-rw- 1 <user> None 117,  5 May  9 04:55 /dev/ttyS5
$
The FT232H board is connected to port /dev/ttyS10 (or COM11):
We use the PuTTY terminal application to connect to the board on the
COM11 port: 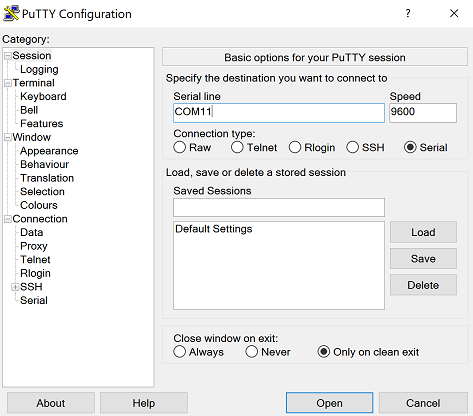
Press Open and you should get a terminal screen titled “COM11 - PuTTY”
If there’s no Mynewt app running, or the Mynewt app doesn’t have the Shell and Console enabled, you won’t see anything there, but you can always refer back to this page from later tutorials if you need to.
Now that you know how to communicate with your Mynewt application, let’s move on to creating one!