Everything You Need in a Docker Container
Docker provides a quick and easy way to get up and running with Mynewt. The newt command line tool and the entire build toolchain is available in a single docker container. The container is all that’s needed to run your Mynewt based application in the simulator. Enabling USB2 with your docker installation will allow you to load your application on a supported device.
Docker is the only supported option if you are working on a Windows machine. If you are using Mac OS X or Linux, you have the choice of installing a Docker container of tools and toolchains or installing them natively. This chapter describes how to set up the Docker image for all three platforms.
Install Docker
Install docker for your platform. Mac OS X / Windows / Linux
Mac and Windows
Mac and Windows require Docker Toolbox to interact with USB devices. Docker for Mac and Docker for Windows do not support USB. Docker Toolbox uses VirtualBox and allows you to map USB devices into docker containers as described below.
Make sure to double click the Docker Quickstart Terminal application if you’re on Mac or Windows.
Pull the Mynewt Container
$ docker pull mynewt/newt:latest
Note You can upgrade your container by repeating this command when updates are made available.
Use a newt wrapper script
Use the newt wrapper script to invoke newt. Create the following file,
name it newt, make it executable, and put it in your path. This will
allow you to run newt as if it was natively installed. You can now
follow the normal tutorials using the newt wrapper script.
#!/bin/bash

if [ "$1" = "debug" ] || [ "$1" = "run" ]
then
    ti="-ti"
fi

docker run -e NEWT_USER=$(id -u) -e NEWT_GROUP=$(id -g) -e NEWT_HOST=$(uname) $ti --rm --device=/dev/bus/usb --privileged -v $(pwd):/workspace -w /workspace mynewt/newt:latest /newt "$@"
Note Remember to point to the correct subdirectory level when
invoking newt. For example, invoke it using ../newt in the
example below.
user@~/dockertest$ ls
myproj  newt
user@~/dockertest$ cd myproj
user@~/dockertest/myproj$ ../newt version
Apache Newt version: 1.1.0
Enable USB2 Support for Mac or Windows
If you plan on loading your application on an actual device, do the steps below.
Install VirtualBox extension pack
Docker uses a VirtualBox Linux VM to run containers. A free VirtualBox extension pack is required to enable USB2 support. Download the VirtualBox Extension Pack version that matches your VirtualBox installation and double click to install
Enable USB2 and select your device
The “default” VM created by docker-machine must first be stopped before you can enable USB2. You have two options:
Run the command
docker-machine stop defaultin the terminal window orUse the VirtualBox UI. Right click on
default-> Close -> Power Off
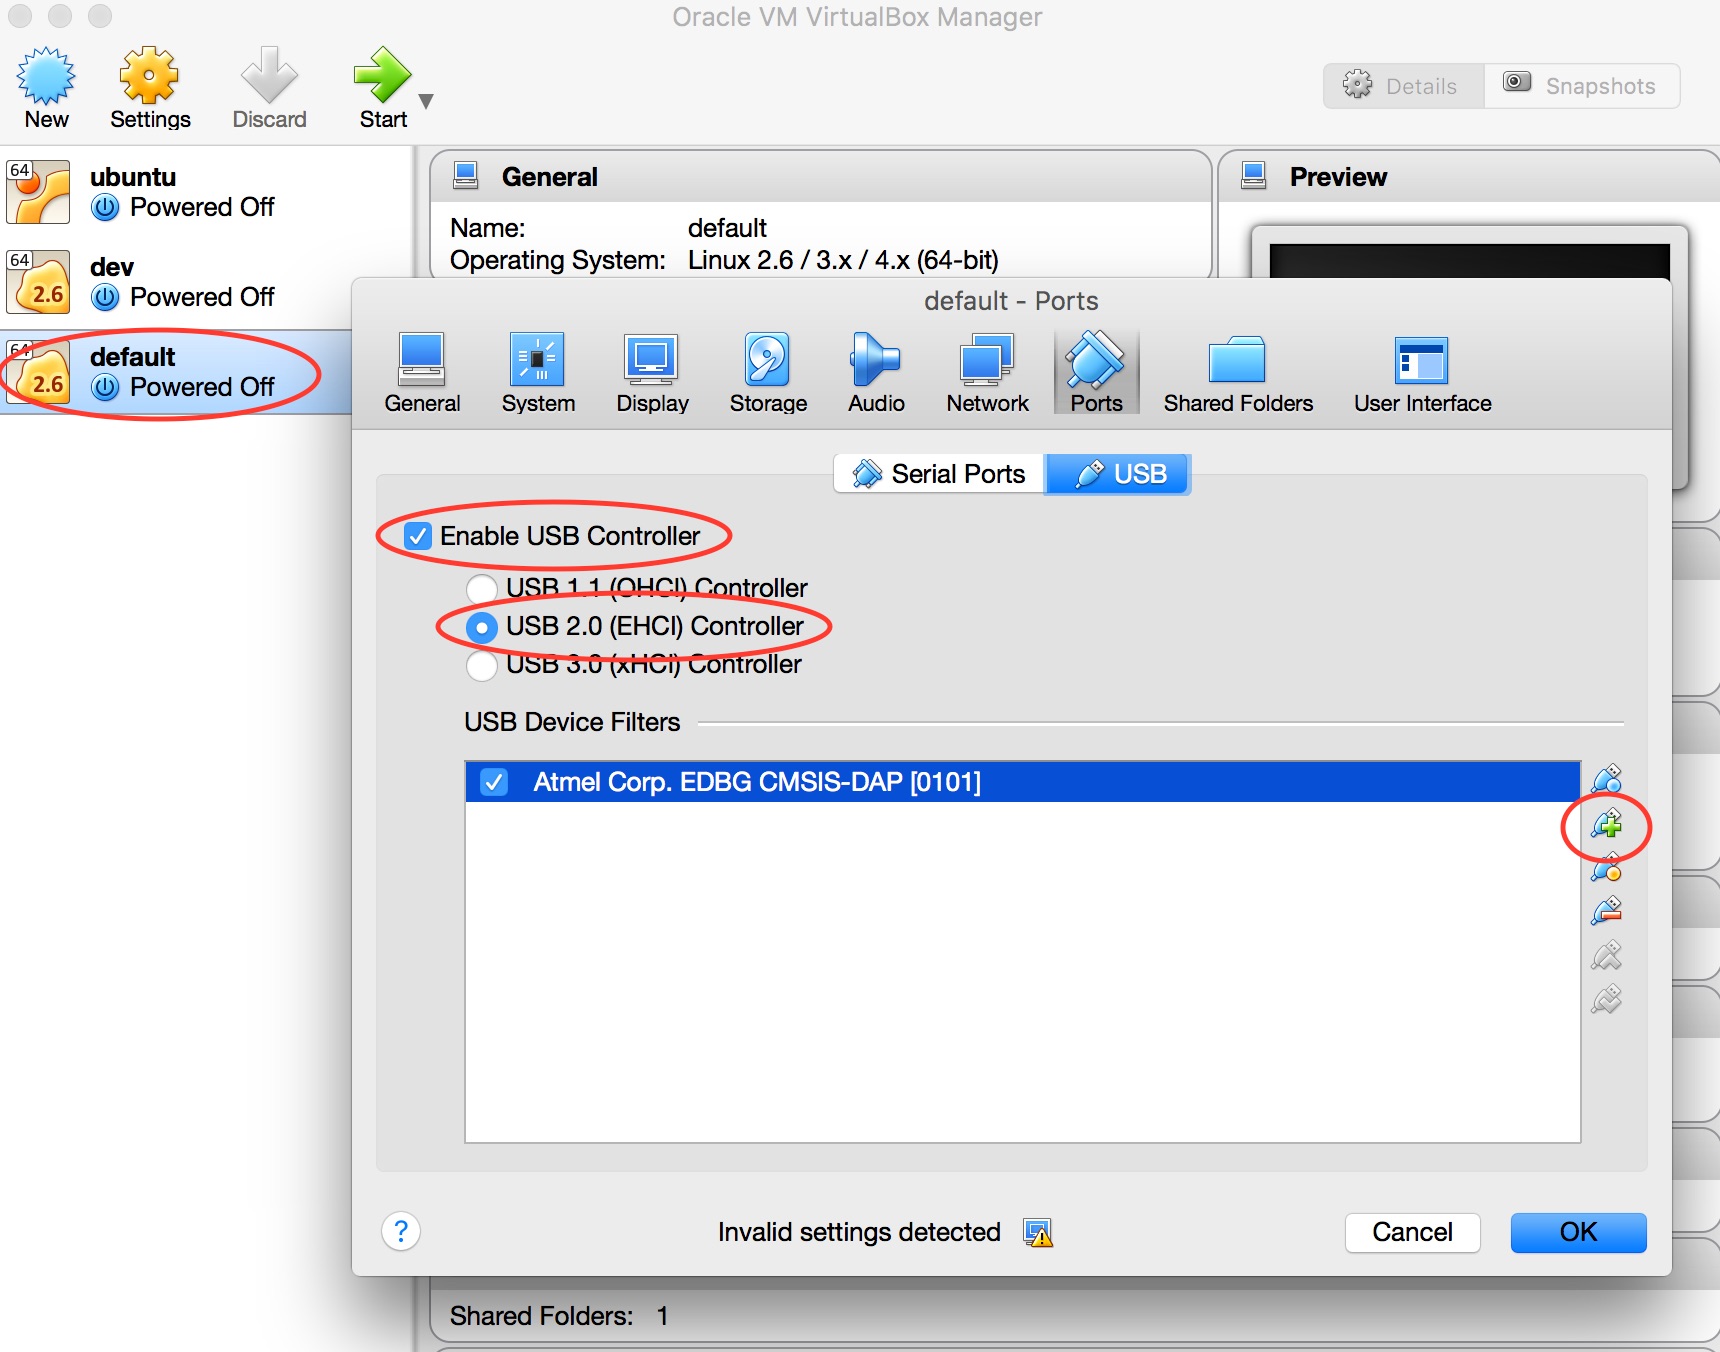
Enable USB2 using the VirtualBox UI. Select the “default” VM->Settings->Ports->USB2 to enable USB2. Add your device to the USB Device Filters to make the device visible in the docker container. See the image below.
Restart the “default” VM. You have two options:
Run
docker-machine start defaultin the terminal window orUse the VirtualBox UI. Make sure the “default” machine is highlighted. Click the green “Start” button. Select “Headless Start”.
Note: When working with actual hardware, remember that each board
has an ID. If you swap boards and do not refresh the USB Device Filter
on the VirtualBox UI, the ID might be stale and the Docker instance may
not be able to see the board correctly. For example, you may see an
error message like Error: unable to find CMSIS-DAP device when you
try to load or run an image on the board. In that case, you need to
click on the USB link in VirtualBox UI, remove the existing USB Device
Filter (e.g. “Atmel Corp. EDBG CMSIS-DAP[0101]”) by clicking on the
“Removes selected USB filter” button, and add a new filter by clicking
on the “Adds new USB filter” button.