Project Slinky Using Olimex Board
This tutorial shows you how to create, build and run the Slinky application and communicate with newtmgr for an Olimex STM-E407 board.
Prerequisites
Meet the prerequisites listed in Project Slinky
Have a STM32-E407 development board from Olimex.
Have a ARM-USB-TINY-H connector with JTAG interface for debugging ARM microcontrollers (comes with the ribbon cable to hook up to the board)
Have a USB A-B type cable to connect the debugger to your computer.
Have a USB to TTL Serial Cable with female wiring harness.
Install the OpenOCD debugger.
Create a New Project
Create a new project if you do not have an existing one. You can skip this step and proceed to Create the Targets if you already have a project created or completed the Sim Slinky tutorial.
$ newt new slinky
Downloading project skeleton from apache/mynewt-blinky...
...
Installing skeleton in slinky...
Project slink successfully created
$ cd slinky
$ newt upgrade
Downloading repository mynewt-core (commit: master) ...
...
apache-mynewt-core successfully upgraded to version 1.7.0
mcuboot successfully upgraded to version 1.3.1
Create the Targets
Create two targets for the STM32-E407 board - one for the bootloader and one for the Slinky application.
Run the following newt target commands, from your project directory,
to create a bootloader target. We name the target stm32_boot.
$ newt target create stm32_boot
$ newt target set stm32_boot bsp=@apache-mynewt-core/hw/bsp/olimex_stm32-e407_devboard
$ newt target set stm32_boot build_profile=optimized
$ newt target set stm32_boot target.app=@mcuboot/boot/mynewt
Run the following newt target commands to create a target for the
Slinky application. We name the target stm32_slinky.
$ newt target create stm32_slinky
$ newt target set stm32_slinky bsp=@apache-mynewt-core/hw/bsp/olimex_stm32-e407_devboard
$ newt target set stm32_slinky build_profile=debug
$ newt target set stm32_slinky app=@apache-mynewt-core/apps/slinky
Build the Targets
Run the newt build stm32_boot command to build the bootloader:
$ newt build stm32_boot
Building target targets/stm32_boot
Compiling repos/mcuboot/boot/bootutil/src/caps.c
Compiling repos/mcuboot/boot/bootutil/src/encrypted.c
Compiling repos/mcuboot/boot/bootutil/src/bootutil_misc.c
Compiling repos/apache-mynewt-core/apps/slinky/src/main.c
Compiling repos/mcuboot/boot/bootutil/src/image_ec.c
Compiling repos/mcuboot/boot/bootutil/src/image_ec256.c
Compiling repos/mcuboot/boot/bootutil/src/image_ed25519.c
Compiling repos/mcuboot/boot/bootutil/src/image_rsa.c
Compiling repos/apache-mynewt-core/boot/split/src/split_config.c
      ...
Archiving @apache-mynewt-core_util_rwlock.a
Archiving @apache-mynewt-core_util_streamer.a
Linking ~/dev/slinky/bin/targets/stm32_boot/app/@mcuboot/boot/mynewt/mynewt.elf
Target successfully built: targets/stm32_boot
$
Run the newt build stm32_slinky command to build the Slinky
application:
$newt build stm32_slinky
Building target targets/stm32_slinky
Compiling repos/mcuboot/boot/bootutil/src/caps.c
Compiling repos/mcuboot/boot/bootutil/src/encrypted.c
Compiling repos/mcuboot/boot/bootutil/src/bootutil_misc.c
Compiling repos/apache-mynewt-core/apps/slinky/src/main.c
Compiling repos/mcuboot/boot/bootutil/src/image_ec.c
Compiling repos/mcuboot/boot/bootutil/src/image_ec256.c
Compiling repos/mcuboot/boot/bootutil/src/image_ed25519.c
Compiling repos/mcuboot/boot/bootutil/src/image_rsa.c
Compiling repos/apache-mynewt-core/boot/split/src/split_config.c
       ...
Archiving @apache-mynewt-core_util_rwlock.a
Archiving @apache-mynewt-core_util_streamer.a
Linking ~/dev/slinky/bin/targets/stm32_slinky/app/@apache-mynewt-core/apps/slinky/slinky.elf
Target successfully built: targets/stm32_slinky
$
Sign and Create the Slinky Application Image
Run the newt create-image stm32_slinky 1.0.0 command to create and
sign the application image. You may assign an arbitrary version (e.g.
1.0.0) to the image.
newt create-image stm32_slinky 1.0.0
App image succesfully generated: ~/dev/slinky/bin/targets/stm32_slinky/app/apps/slinky/slinky.img
$
Connect to the Board
Connect the USB A-B type cable to the ARM-USB-TINY-H debugger connector.
Connect the ARM-USB-Tiny-H debugger connector to your computer and the board.
Connect the USB Micro-A cable to the USB-OTG2 port on the board.
Set the Power Sel jumper on the board to pins 5 and 6 to select USB-OTG2 as the power source. If you would like to use a different power source, refer to the OLIMEX STM32-E407 user manual for pin specifications.
You should see a red LED light up on the board.
Load the Bootloader and the Slinky Application Image
Run the newt load stm32_boot command to load the bootloader onto the
board:
$ newt load stm32_boot
Loading bootloader
$
Note: If you are using Windows and get a no device found error, you
will need to install the usb driver. Download Zadig
and run it:
Select Options > List All Devices.
Select
Olimex OpenOCD JTAG ARM-USB-TINY-Hfrom the drop down menu.Select the
WinUSBdriver.Click Install Driver.
Run the
newt load stm32_bootcommand again.
Run the newt load stm32_slinky command to load the Slinky
application image onto the board:
$ newt load stm32_slinky
Loading app image into slot 1
$
Connect Newtmgr with the Board using a Serial Connection
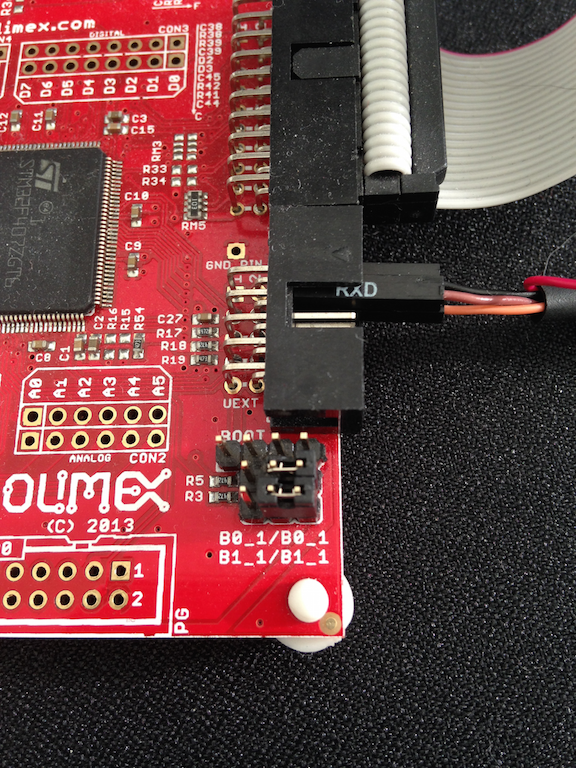
Locate the PC6/USART6_TX (pin 3), PC7/USART6_RX (pin 4), and GND (pin 2) of the UEXT connector on the Olimex board. More information on the UEXT connector can be found at https://www.olimex.com/Products/Modules/UEXT/. The schematic of the board can be found at https://www.olimex.com/Products/ARM/ST/STM32-E407/resources/STM32-E407_sch.pdf for reference.
Alt Layout - Serial Connection
Connect the female RX pin of the USB-TTL serial cable to the TX (Pin 3) of the UEXT connector on the board.
Connect the female TX pin of the USB-TTL serial cable to the RX (Pin 4) of the UEXT connector on the board.
Connect the GND pin of the USB-TTL serial cable to the GND (Pin 2) of the UEXT connector on the board.
Locate the port, in the /dev directory on your computer, that the serial connection uses. The format of the port name is platform dependent:
Mac OS uses the format
tty.usbserial-<some identifier>.Linux uses the format
TTYUSB<N>, whereNis a number. For example, TTYUSB2.MinGW on Windows uses the format
ttyS<N>, whereNis a number. You must map the port name to a Windows COM port:/dev/ttyS<N>maps toCOM<N+1>. For example,/dev/ttyS2maps toCOM3.You can also use the Windows Device Manager to find the COM port number.
$ ls /dev/tty*usbserial*
/dev/tty.usbserial-1d13
$
Setup a newtmgr connection profile for the serial port. For our
example, the port is /dev/tty.usbserial-1d13.
Run the newtmgr conn add command to define a newtmgr connection
profile for the serial port. We name the connection profile
stm32serial.
Note:
You will need to replace the
connstringwith the specific port for your serial connection.On Windows, you must specify
COM<N+1>for the connstring if/dev/ttyS<N>is the serial port.
$ newtmgr conn add stm32serial type=serial connstring=/dev/tty.usbserial-1d13
Connection profile stm32serial successfully added
$
You can run the newt conn show command to see all the newtmgr
connection profiles:
$ newtmgr conn show
Connection profiles:
  stm32serial: type=serial, connstring='/dev/tty.usbserial-1d13'
  sim1: type=serial, connstring='/dev/ttys012'
$
Use Newtmgr to Query the Board
Run some newtmgr commands to query and receive responses back from the board (See the Newt Manager Guide for more information on the newtmgr commands).
Run the newtmgr echo hello -c stm32serial command. This is the
simplest command that requests the board to echo back the text.
$ newtmgr echo hello -c stm32serial
hello
$
Run the newtmgr image list -c stm32serial command to list the
images on the board:
$ newtmgr image list -c stm32serial
Images:
 slot=0
    version: 1.0.0
    bootable: true
    flags: active confirmed
    hash: 9cf8af22b1b573909a8290a90c066d4e190407e97680b7a32243960ec2bf3a7f
Split status: N/A
$
Run the newtmgr taskstat -c stm32serial command to display the task
statistics on the board:
$ newtmgr taskstat -c stm32serial
      task pri tid  runtime      csw    stksz   stkuse last_checkin next_checkin
      idle 255   0   157179   157183       64       25        0        0
      main 127   1        4       72     1024      356        0        0
     task1   8   2        0      158      192      114        0        0
     task2   9   3        0      158       64       30        0        0
$