Adding an Analog Sensor on nRF52
We will be adding an analog sensor to the NRF52DK development board and using the Analog to Digital Converter (ADC) to read the values from the sensor. It’s also using Bluetooth to allow you to connect to the app and read the value of the sensor.
Required Hardware
Create a Project
Create a new project to hold your work. For a deeper understanding, you can read about project creation in Get Started – Creating Your First Project or just follow the commands below.
$ mkdir ~/dev
$ cd ~/dev
$ newt new myadc
Downloading project skeleton from apache/mynewt-blinky...
Downloading repository mynewt-blinky (commit: master) ...
Installing skeleton in myadc...
Project myadc successfully created.
$ cd myadc
Change the Repo Version in project.yml
Recently, members of the Mynewt community have contributed great efforts to integrate the nrfx drivers, but to take advantage of such resources, we will need to use the master of the Mynewt repo (pre v1.4.0 release). To be set at the master of the Mynewt repo, we will need to change the repo version in our project.yml file. If you’re not familiar with using repositories,
see the section on repositories before continuing.
In your project.yml file, change the vers field under repository.apache-mynewt-core from 1-latest to 0-dev. When you’re done, your project.yml file should look like this:
project.name: "my_project"

project.repositories:
    - apache-mynewt-core
    - mynewt_nordic

# Use github's distribution mechanism for core ASF libraries.
# This provides mirroring automatically for us.

repository.apache-mynewt-core:
    type: github
    vers: 0-dev
    user: apache
    repo: mynewt-core
If you already have newt previously installed, you can still change the repo version in your project.yml file, but you will need to run newt upgrade for the change to take effect.
Install Everything
Now that you have defined the needed repositories, it’s time to install everything so that you can get started.
$ newt upgrade -v
Downloading repository mynewt-core (commit: master) ...
Downloading repository mynewt-nimble (commit: master) ...
Downloading repository mynewt-mcumgr (commit: master) ...
Downloading repository mcuboot (commit: master) ...
apache-mynewt-core successfully installed version 0.0.0
apache-mynewt-nimble successfully installed version 0.0.0
apache-mynewt-mcumgr successfully installed version 0.0.0
mcuboot successfully installed version 0.0.0
Create the App and Targets
For the sensor app we will be building and modifying on top of the bleprph app so that we get the Bluetooth communications built in. The first thing we’ll need to do is copy that app into our own app directory:
$ mkdir -p apps/nrf52_adc
$ cp -Rp repos/apache-mynewt-core/apps/bleprph/* apps/nrf52_adc
Next, you’ll modify the pkg.yml file for your app. Note the change in pkg.name and pkg.description. Also make sure that you specify the full path of all the packages with the prefix @apache-mynewt-core/ as shown in the third highlighted line.
$ cat apps/nrf52_adc/pkg.yml
...
pkg.name: apps/nrf52_adc
pkg.type: app
pkg.description: Simple BLE peripheral
application for ADC Sensors.
pkg.author: "Apache Mynewt <dev@mynewt.incubator.apache.org>"
pkg.homepage: "http://mynewt.apache.org/"
pkg.keywords:

pkg.deps:
    - "@apache-mynewt-core/boot/split"
    - "@mcuboot/boot/bootutil"
    - "@apache-mynewt-core/kernel/os"
    - "@apache-mynewt-core/mgmt/imgmgr"
    - "@apache-mynewt-core/mgmt/newtmgr"
    - "@apache-mynewt-core/mgmt/newtmgr/transport/ble"
    - "@apache-mynewt-core/net/nimble/host"
    - "@apache-mynewt-core/net/nimble/host/services/ans"
    - "@apache-mynewt-core/net/nimble/host/services/gap"
    - "@apache-mynewt-core/net/nimble/host/services/gatt"
    - "@apache-mynewt-core/net/nimble/host/store/config"
    - "@apache-mynewt-core/net/nimble/host/util"
    - "@apache-mynewt-core/net/nimble/transport"
    - "@apache-mynewt-core/sys/console/full"
    - "@apache-mynewt-core/sys/log/full"
    - "@apache-mynewt-core/sys/stats/full"
    - "@apache-mynewt-core/sys/sysinit"
    - "@apache-mynewt-core/sys/id"
Create two targets - one for the bootloader and one for the nrf52 board.
Note: The correct bsp must be chosen for the board you are using.
For the Nordic Dev Kit choose
@apache-mynewt-core/hw/bsp/nrf52dkfor the bspFor the Rigado Eval Kit choose
@apache-mynewt-core/hw/bsp/bmd300evalfor the bsp
$ newt target create nrf52_adc
$ newt target set nrf52_adc app=apps/nrf52_adc
$ newt target set nrf52_adc bsp=@apache-mynewt-core/hw/bsp/nrf52dk
$ newt target set nrf52_adc build_profile=debug

$ newt target create nrf52_boot
$ newt target set nrf52_boot app=@mcuboot/boot/mynewt
$ newt target set nrf52_boot bsp=@apache-mynewt-core/hw/bsp/nrf52dk
$ newt target set nrf52_boot build_profile=optimized

$ newt target show
targets nrf52_adc
    app=apps/nrf52_adc
    bsp=@apache-mynewt-core/hw/bsp/nrf52dk
    build_profile=debug
targets nrf52_boot
    app=@mcuboot/boot/mynewt
    bsp=@apache-mynewt-core/hw/bsp/nrf52dk
    build_profile=optimized
Note: If you’ve already built and installed a bootloader for your NRF52dk then you do not need to create a target, build and load it here.
Build the Target Executables
$ newt build nrf52_boot
...
Compiling boot.c
Archiving boot.a
Linking boot.elf
App successfully built: ~/dev/myadc/bin/nrf52_boot/boot/mynewt/mynewt.elf
$ newt build nrf52_adc
...
Compiling main.c
Archiving nrf52_adc.a
Linking nrf52_adc.elf
App successfully built: ~/dev/myadc/bin/nrf52\_adc/apps/nrf52_adc/nrf52_adc.elf
Sign and Create the nrf52_adc Application Image
You must sign and version your application image to download it using newt to the board.
Use the newt create-image command to perform this action. You may assign an arbitrary
version (e.g. 1.0.0) to the image.
$ newt create-image nrf52_adc 1.0.0
App image successfully generated: ~/dev/myadc/bin/nrf52_adc/apps/nrf52_adc/nrf52_adc.img
Build manifest: ~/dev/myadc/bin/nrf52_adc/apps/nrf52_adc/manifest.json
Connect the Board
Connect the evaluation board via micro-USB to your PC via USB cable.
Download to the Target
Download the bootloader first and then the nrf52_adc executable to the target platform. Don’t forget to reset the board if you don’t see the LED blinking right away!
$ newt load nrf52_boot
$ newt load nrf52_adc
Note: If you want to erase the flash and load the image again, you can use JLinkExe to issue an erase command.
$ JLinkExe -device nRF52 -speed 4000 -if SWD
SEGGER J-Link Commander
V5.12c (Compiled Apr 21 2016 16:05:51)
DLL version V5.12c, compiled Apr 21 2016 16:05:45

Connecting to J-Link via USB...O.K.
Firmware: J-Link
OB-SAM3U128-V2-NordicSemi compiled Mar 15 2016 18:03:17
Hardware version: V1.00
S/N: 682863966
VTref = 3.300V

Type "connect" to establish a target connection, '?' for help
J-Link>erase
Cortex-M4 identified.
Erasing device (0;?i?)...
Comparing flash     [100%] Done.
Erasing flash       [100%] Done.
Verifying flash     [100%] Done.
J-Link: Flash download: Total time needed: 0.363s (Prepare: 0.093s, Compare: 0.000s, Erase: 0.262s, Program: 0.000
s, Verify: 0.000s, Restore: 0.008s)
Erasing done.
J-Link>exit
$
So you have a BLE app, but really all you’ve done is change the name of the bleprph app to nrf52_adc and load that. Not all that impressive, and it certainly won’t read an Analog Sensor right now. So let’s do that next. In order to read an ADC sensor, we’ll create a driver for it here in our app that will leverage the existing nrfx driver. It adds another layer of indirection, but it will also give us a look at building our own driver, so we’ll do it this way.
Building a Driver
The first thing to do is to create the directory structure for your driver:
$ mkdir -p libs/my_drivers/myadc/include/myadc
$ mkdir -p libs/my_drivers/myadc/src
Now you can add the files you need. You’ll need a pkg.yml to describe the driver, and then header stub followed by source stub.
$ cat libs/my_drivers/myadc/pkg.yml
#
# Licensed to the Apache Software Foundation (ASF) under one
# or more contributor license agreements.  See the NOTICE file
# distributed with this work for additional information
# regarding copyright ownership.  The ASF licenses this file
# to you under the Apache License, Version 2.0 (the
# "License"); you may not use this file except in compliance
# with the License.  You may obtain a copy of the License at
#
#  http://www.apache.org/licenses/LICENSE-2.0
#
# Unless required by applicable law or agreed to in writing,
# software distributed under the License is distributed on an
# "AS IS" BASIS, WITHOUT WARRANTIES OR CONDITIONS OF ANY
# KIND, either express or implied.  See the License for the
# specific language governing permissions and limitations
# under the License.
#
pkg.name: libs/my_drivers/myadc
pkg.deps:
    - "@apache-mynewt-core/hw/hal"
First, let’s create the required header file myadc.h in the include
directory (i.e. libs/my_drivers/myadc/include/myadc/myadc.h). It’s a
pretty straightforward header file, since we only need to do 2 things:
Initialize the ADC device
Read ADC Values
#ifndef _NRF52_ADC_H_
#define _NRF52_ADC_H_

void * adc_init(void);
int adc_read(void *buffer, int buffer_len);

#endif /* _NRF52_ADC_H_ */
Next we’ll need a corresponding source file myadc.c in the src
directory. This is where we’ll implement the specifics of the driver:
#include <assert.h>
#include <os/os.h>
#include <string.h>

/* ADC */
#include "myadc/myadc.h"
#include "nrf.h"
#include <adc/adc.h>

/* Nordic headers */
#include <nrfx.h>
#include <nrf_saadc.h>
#include <nrfx_saadc.h>
#include <nrfx_config.h>

#define ADC_NUMBER_SAMPLES (2)
#define ADC_NUMBER_CHANNELS (1)

nrfx_saadc_config_t adc_config = NRFX_SAADC_DEFAULT_CONFIG;

struct adc_dev *adc;
uint8_t *sample_buffer1;
uint8_t *sample_buffer2;

void *
adc_init(void)
{
    nrf_saadc_channel_config_t cc = NRFX_SAADC_DEFAULT_CHANNEL_CONFIG_SE(NRF_SAADC_INPUT_AIN1);
    cc.gain = NRF_SAADC_GAIN1_6;
    cc.reference = NRF_SAADC_REFERENCE_INTERNAL;
    adc = (struct adc_dev *) os_dev_open("adc0", 0, &adc_config);
    assert(adc != NULL);
    adc_chan_config(adc, 0, &cc);
    sample_buffer1 = malloc(adc_buf_size(adc, ADC_NUMBER_CHANNELS, ADC_NUMBER_SAMPLES));
    sample_buffer2 = malloc(adc_buf_size(adc, ADC_NUMBER_CHANNELS, ADC_NUMBER_SAMPLES));
    memset(sample_buffer1, 0, adc_buf_size(adc, ADC_NUMBER_CHANNELS, ADC_NUMBER_SAMPLES));
    memset(sample_buffer2, 0, adc_buf_size(adc, ADC_NUMBER_CHANNELS, ADC_NUMBER_SAMPLES));
    adc_buf_set(adc, sample_buffer1, sample_buffer2,
        adc_buf_size(adc, ADC_NUMBER_CHANNELS, ADC_NUMBER_SAMPLES));
    return adc;
}

int
adc_read(void *buffer, int buffer_len)
{
    int i;
    int adc_result;
    int my_result_mv = 0;
    int rc;
    for (i = 0; i < ADC_NUMBER_SAMPLES; i++) {
        rc = adc_buf_read(adc, buffer, buffer_len, i, &adc_result);
        if (rc != 0) {
            goto err;
        }
        my_result_mv = adc_result_mv(adc, 0, adc_result);
    }
    adc_buf_release(adc, buffer, buffer_len);
    return my_result_mv;
err:
    return (rc);
}
There’s a lot going on in here, so let’s walk through it step by step.
First, we don’t need to define a default configuration for our ADC - this has already been created. So we initialize the ADC in adc_init():
void *
adc_init(void)
{
    nrf_saadc_channel_config_t cc = NRFX_SAADC_DEFAULT_CHANNEL_CONFIG_SE(NRF_SAADC_INPUT_AIN1);
    cc.gain = NRF_SAADC_GAIN1_6;
    cc.reference = NRF_SAADC_REFERENCE_INTERNAL;
    adc = (struct adc_dev *) os_dev_open("adc0", 0, &adc_config);
    assert(adc != NULL);
    adc_chan_config(adc, 0, &cc);
    sample_buffer1 = malloc(adc_buf_size(adc, ADC_NUMBER_CHANNELS, ADC_NUMBER_SAMPLES));
    sample_buffer2 = malloc(adc_buf_size(adc, ADC_NUMBER_CHANNELS, ADC_NUMBER_SAMPLES));
    memset(sample_buffer1, 0, adc_buf_size(adc, ADC_NUMBER_CHANNELS, ADC_NUMBER_SAMPLES));
    memset(sample_buffer2, 0, adc_buf_size(adc, ADC_NUMBER_CHANNELS, ADC_NUMBER_SAMPLES));
    adc_buf_set(adc, sample_buffer1, sample_buffer2,
        adc_buf_size(adc, ADC_NUMBER_CHANNELS, ADC_NUMBER_SAMPLES));
    return adc;
}
A few things need to be said about this part, as it is the most
confusing. First, we’re using a default configuration for the ADC
Channel via the NRFX_SAADC_DEFAULT_CHANNEL_CONFIG_SE macro. The
important part here is that we’re actually using AIN1. I know what
you’re thinking, “But we want ADC-0!” and that’s true. The board is
actually labelled ‘A0, A1, A2’ etc., and the actual pin numbers are also
listed on the board, which seems handy. At first. But it gets messy very
quickly.
If you try to use AIN0, and then go poke around in the registers while this is running,
(gdb) p/x {NRF_SAADC_Type}0x40007000
...
 CH = {{
      PSELP = 0x1,
      PSELN = 0x0,
      CONFIG = 0x20000,
      LIMIT = 0x7fff8000
    },
You’ll see that the pin for channel 0 is set to 1, which corresponds to AIN0, but that’s NOT the same as A0 – pin P0.03, the one we’re using. For that, you use AIN1, which would set the pin value to 2. Messy. Someone, somewhere, thought this made sense.
The only other thing to note here is that we’re using the internal
reference voltage, rather than setting our own. There’s nothing wrong
with that, but since we are, we’ll have to crank up the gain a bit by
using NRF_SAADC_GAIN1_6.
Then, in adc_read() we will take readings, convert the raw readings
to a millivolt equivalent, and return the result.
int
adc_read(void *buffer, int buffer_len)
{
    int i;
    int adc_result;
    int my_result_mv = 0;
    int rc;
    for (i = 0; i < ADC_NUMBER_SAMPLES; i++) {
        rc = adc_buf_read(adc, buffer, buffer_len, i, &adc_result);
        if (rc != 0) {
            goto err;
        }
        my_result_mv = adc_result_mv(adc, 0, adc_result);
    }
    adc_buf_release(adc, buffer, buffer_len);
    return my_result_mv;
err:
    return (rc);
}
Finally, we’ll need to enable the ADC, which is disabled by default. To override this setting, we need to add a syscfg.yml file to our nrf52_adc target:
$ cat targets/nrf52_adc/syscfg.yml
syscfg.vals:
 # Enable ADC 0
 ADC_0: 1
Once that’s all done, you should have a working ADC Driver for your
nRF52dk board. The last step in getting the driver set up is to include
it in the package dependency defined by pkg.deps in the pkg.yml
file of your app. You will also need to add the mcu/nordic package. Add them in apps/nrf52_adc/pkg.yml as shown below:
# Licensed to the Apache Software Foundation (ASF) under one
# <snip>

pkg.name: apps/nrf52_adc
pkg.type: app
pkg.description: Simple BLE peripheral application for ADC sensor.
pkg.author: "Apache Mynewt <dev@mynewt.incubator.apache.org>"
pkg.homepage: "http://mynewt.apache.org/"
pkg.keywords:

pkg.deps:
    - "@apache-mynewt-core/boot/split"
    - "@mcuboot/boot/bootutil"
    - "@apache-mynewt-core/kernel/os"
    - "@apache-mynewt-core/mgmt/imgmgr"
    - "@apache-mynewt-core/mgmt/newtmgr"
    - "@apache-mynewt-core/mgmt/newtmgr/transport/ble"
    - "@apache-mynewt-core/net/nimble/host"
    - "@apache-mynewt-core/net/nimble/host/services/ans"
    - "@apache-mynewt-core/net/nimble/host/services/gap"
    - "@apache-mynewt-core/net/nimble/host/services/gatt"
    - "@apache-mynewt-core/net/nimble/host/store/config"
    - "@apache-mynewt-core/net/nimble/host/util"
    - "@apache-mynewt-core/net/nimble/transport"
    - "@apache-mynewt-core/sys/console/full"
    - "@apache-mynewt-core/sys/log/full"
    - "@apache-mynewt-core/sys/stats/full"
    - "@apache-mynewt-core/sys/sysinit"
    - "@apache-mynewt-core/sys/id"
    - "@apache-mynewt-core/hw/mcu/nordic"
    - "libs/my_drivers/myadc"
Creating the ADC Task
Now that the driver is done, we’ll need to add calls to the main app’s
main.c file, as well as a few other things. First, we’ll need to
update the includes, and add a task for our ADC sampling.
#include <adc/adc.h>
....
#include "myadc/myadc.h"
....
/* ADC Task settings */
#define ADC_TASK_PRIO           5
#define ADC_STACK_SIZE          (OS_STACK_ALIGN(336))
struct os_eventq adc_evq;
struct os_task adc_task;
bssnz_t os_stack_t adc_stack[ADC_STACK_SIZE];
Next we’ll need to initialize the task event_q so we’ll add the
highlighted code to main() as shown below. You can also change the name of your Bluetooth device in ble_svc_gap_device_name_set:
/* Set the default device name. */
rc = ble_svc_gap_device_name_set("nimble-adc");
assert(rc == 0);

#if MYNEWT_VAL(BLEPRPH_LE_PHY_SUPPORT)
  phy_init();
#endif

conf_load();

/* Initialize adc sensor task eventq */
os_eventq_init(&adc_evq);

/* Create the ADC reader task.
 * All sensor operations are performed in this task.
 */
os_task_init(&adc_task, "sensor", adc_task_handler,
        NULL, ADC_TASK_PRIO, OS_WAIT_FOREVER,
        adc_stack, ADC_STACK_SIZE);
We’ll need that adc_task_handler() function to exist, and that’s where
we’ll initialize the ADC Device and set the event handler. In the task’s
while() loop, we’ll just make a call to``adc_sample()`` to cause the ADC
driver to sample the adc device.
/**
 * Event loop for the sensor task.
 */
static void
adc_task_handler(void *unused)
{
    struct adc_dev *adc;
    int rc;
    /* ADC init */
    adc = adc_init();
    rc = adc_event_handler_set(adc, adc_read_event, (void *) NULL);
    assert(rc == 0);

    while (1) {
        adc_sample(adc);
        /* Wait 2 second */
        os_time_delay(OS_TICKS_PER_SEC * 2);
    }
}
Above the adc_task_handler, add code to handle the
adc_read_event() calls:
int
adc_read_event(struct adc_dev *dev, void *arg, uint8_t etype,
        void *buffer, int buffer_len)
{
    int value;
    uint16_t chr_val_handle;
    int rc;

    value = adc_read(buffer, buffer_len);
    if (value >= 0) {
        console_printf("Got %d\n", value);
    } else {
        console_printf("Error while reading: %d\n", value);
        goto err;
    }
    gatt_adc_val = value;
    rc = ble_gatts_find_chr(&gatt_svr_svc_adc_uuid.u, BLE_UUID16_DECLARE(ADC_SNS_VAL), NULL, &chr_val_handle);
    assert(rc == 0);
    ble_gatts_chr_updated(chr_val_handle);
    return (0);
err:
    return (rc);
}
This is where we actually read the ADC value and then update the BLE Characteristic for that value.
But wait, we haven’t defined those BLE services and characteristics yet! Right, so don’t try to build and run this app just yet or it will surely fail. Instead, move on to the next section and get all of those services defined.
Building the BLE Services
If the nrf52_adc app is going to be a Bluetooth-enabled sensor app that
will allow you to read the value of the eTape Water Level Sensor via
Bluetooth we’ll need to actually define those Services and
Characteristics.
As with the ble peripheral app, we will
advertise a couple of values from our app. The first is not strictly
necessary, but it will help us build an iOS app later. We’ve defined a
service and the characteristics in that service in bleprph.h in the
apps/nrf52_adc/src/ directory. Make sure to include the host/ble_uuid.h header:
#include "host/ble_uuid.h"
....
/* Sensor Data */
/* e761d2af-1c15-4fa7-af80-b5729002b340 */
static const ble_uuid128_t gatt_svr_svc_adc_uuid =
        BLE_UUID128_INIT(0x40, 0xb3, 0x20, 0x90, 0x72, 0xb5, 0x80, 0xaf,
                         0xa7, 0x4f, 0x15, 0x1c, 0xaf, 0xd2, 0x61, 0xe7);
#define ADC_SNS_TYPE          0xDEAD
#define ADC_SNS_STRING "eTape Liquid Level Sensor"
#define ADC_SNS_VAL           0xBEAD
uint16_t gatt_adc_val;
The first is the UUID of the service, followed by the 2 characteristics we are going to offer. The first characteristic is going to advertise the type of sensor we are advertising, and it will be a read-only characteristic. The second characteristic will be the sensor value itself, and we will allow connected devices to ‘subscribe’ to it in order to get constantly-updated values.
Note: You can choose any valid Characteristic UUIDs to go here. We’re using these values for illustrative purposes only.
The value that we’ll be updating is also defined here as
gatt_adc_val.
If we then go look at gatt_svr.c we can see the structure of the
service and characteristic offering that we set up:
static const struct ble_gatt_svc_def gatt_svr_svcs[] = {
    {
        /*** Service: Security test. */
        .type = BLE_GATT_SVC_TYPE_PRIMARY,
        .uuid = &gatt_svr_svc_sec_test_uuid.u,
        .characteristics = (struct ble_gatt_chr_def[]) { {
            /*** Characteristic: Random number generator. */
            .uuid = &gatt_svr_chr_sec_test_rand_uuid.u,
            .access_cb = gatt_svr_chr_access_sec_test,
            .flags = BLE_GATT_CHR_F_READ | BLE_GATT_CHR_F_READ_ENC,
        }, {
            /*** Characteristic: Static value. */
            .uuid = &gatt_svr_chr_sec_test_static_uuid.u,
            .access_cb = gatt_svr_chr_access_sec_test,
            .flags = BLE_GATT_CHR_F_READ |
                    BLE_GATT_CHR_F_WRITE | BLE_GATT_CHR_F_WRITE_ENC,
        }, {
            0, /* No more characteristics in this service. */
        } },
    },
    {
        /*** ADC Level Notification Service. */
        .type = BLE_GATT_SVC_TYPE_PRIMARY,
        .uuid = &gatt_svr_svc_adc_uuid.u,
        .characteristics = (struct ble_gatt_chr_def[]) { {
            .uuid = BLE_UUID16_DECLARE(ADC_SNS_TYPE),
            .access_cb = gatt_svr_sns_access,
            .flags = BLE_GATT_CHR_F_READ,
        }, {
            .uuid = BLE_UUID16_DECLARE(ADC_SNS_VAL),
            .access_cb = gatt_svr_sns_access,
            .flags = BLE_GATT_CHR_F_NOTIFY,
        }, {
            0, /* No more characteristics in this service. */
        } },
    },

    {
        0, /* No more services. */
    },
};
You should recognize the first services from the BLE Peripheral tutorial earlier. We’re just adding another Service, with 2 new Characteristics, to that application.
We’ll need to fill in the function that will be called for this service,
gatt_svr_sns_access next so that the service knows what to do.
static int
gatt_svr_sns_access(uint16_t conn_handle, uint16_t attr_handle,
                          struct ble_gatt_access_ctxt *ctxt,
                          void *arg)
{
    uint16_t uuid16;
    int rc;

    uuid16 = ble_uuid_u16(ctxt->chr->uuid);

    switch (uuid16) {
    case ADC_SNS_TYPE:
        assert(ctxt->op == BLE_GATT_ACCESS_OP_READ_CHR);
        rc = os_mbuf_append(ctxt->om, ADC_SNS_STRING, sizeof ADC_SNS_STRING);
        BLEPRPH_LOG(INFO, "ADC SENSOR TYPE READ: %s\n", ADC_SNS_STRING);
        return rc == 0 ? 0 : BLE_ATT_ERR_INSUFFICIENT_RES;

    case ADC_SNS_VAL:
        if (ctxt->op == BLE_GATT_ACCESS_OP_WRITE_CHR) {
            rc = gatt_svr_chr_write(ctxt->om, 0,
                                    sizeof gatt_adc_val,
                                    &gatt_adc_val,
                                    NULL);
            return rc;
        } else if (ctxt->op == BLE_GATT_ACCESS_OP_READ_CHR) {
            rc = os_mbuf_append(ctxt->om, &gatt_adc_val,
                                sizeof gatt_adc_val);
            return rc == 0 ? 0 : BLE_ATT_ERR_INSUFFICIENT_RES;
        }

    default:
        assert(0);
        return BLE_ATT_ERR_UNLIKELY;
    }
}
You can see that when request is for the ADC_SNS_TYPE, we return the
Sensor Type we defined earlier. If the request if for ADC_SNS_VAL
we’ll return the gatt_adc_val value.
If you build, load and run this application now, you will see all those
Services and Characteristics advertised, and you will even be able to
read the “Sensor Type” String via the ADC_SNS_TYPE Characteristic.
Adding the eTape Water Sensor
Now that we have a fully functioning BLE App that we can subscribe to sensor values from, it’s time to actually wire up the sensor!
As previously mentioned, we’re going to be using an eTape Water Level Sensor. You can get one from Adafruit.
We’re going to use the sensor as a resistive sensor, and the setup is very simple. I’ll be using a breadboard to put this all together for illustrative purposes. First, attach a jumper-wire from VDD on the board to the breadboard. Next, attach a jumper wire from pin P0.03 on the board to the breadboard. This will be our ADC-in. The sensor should have come with a 560 ohm resistor, so plug that into the board between VDD and ADC-in holes. Finally, attach a jumper from GND on the board to your breadboard. At this point, your breadboard should look like this:
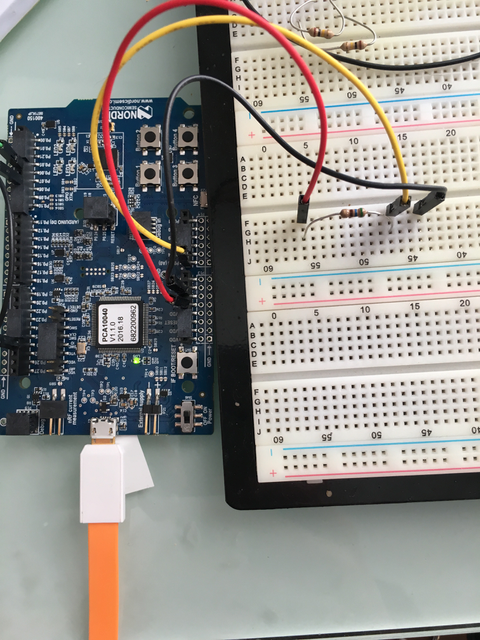
Bread Board Setup
Now attach one of the middle 2 leads from the sensor to ground on the breadboard and the other middle lead to the ADC-in on the breadboard. Your breadboard should now look like this:
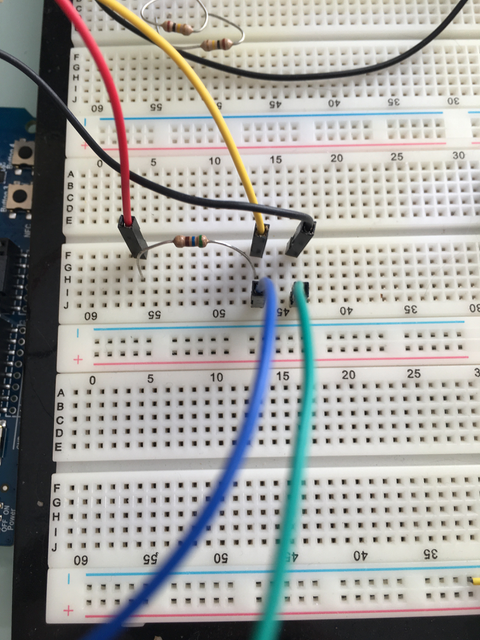
Bread Board Final
And your eTape Sensor should look like this (at least if you have it mounted in a graduated cylinder as I do).
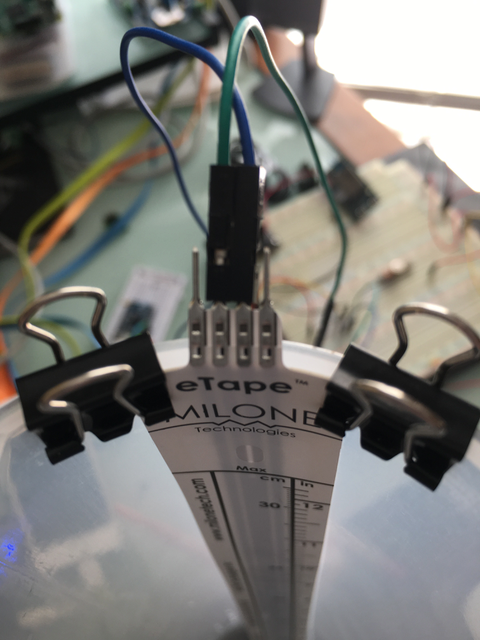
eTape Sensor Setup
That concludes the hardware portion. Easy!
At this point you should be able to build, create-image and load your application and see it properly sending readings.
View Data Remotely via Bluetooth
To view these sensor readings via Bluetooth, you can use LightBlue or a similar app that can connect to Bluetooth devices and read data. Once your sensor application is running, you should see your device show up in LightBlue as nimble-adc (or whatever you named your Bluetooth device):
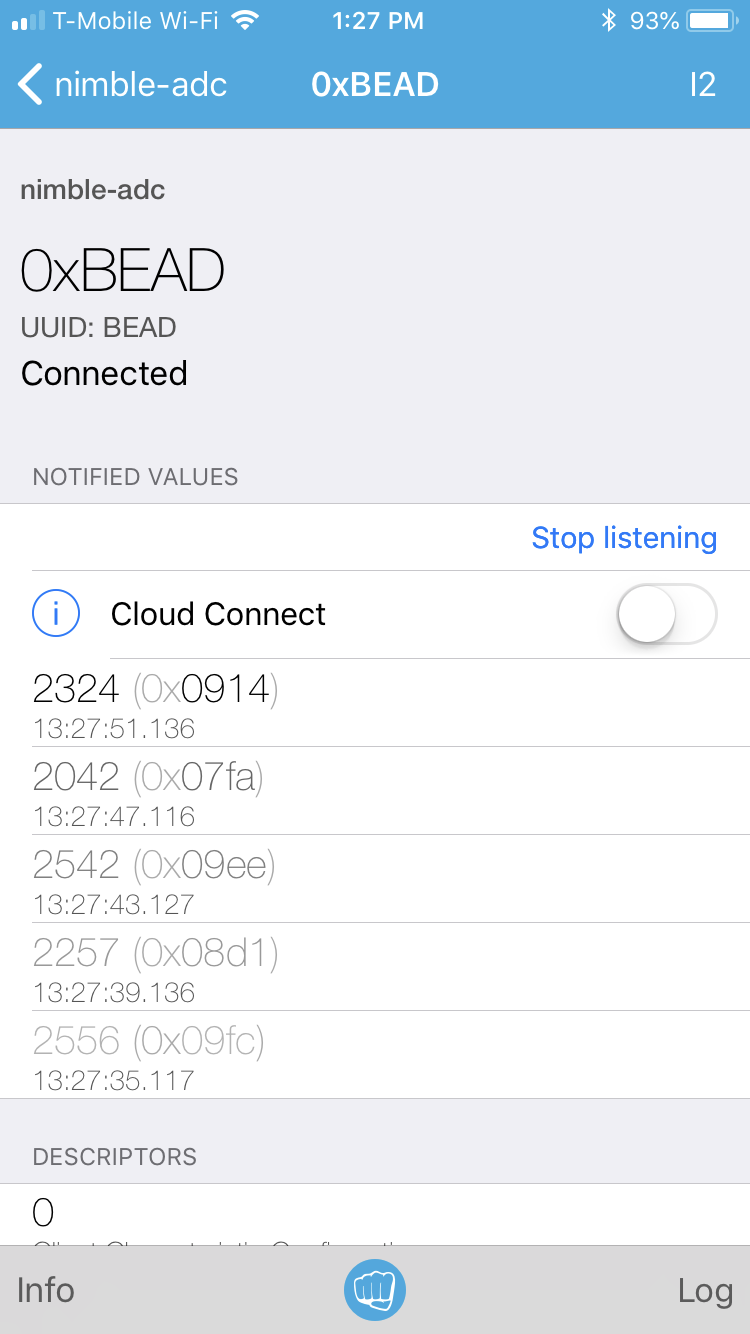
LightBlue connected to the ADC app
Conclusion
Congratulations, you’ve now completed both a hardware project and a software project by connecting a sensor to your device and using Mynewt to read data from that sensor and send it via Bluetooth to a connected device. That’s no small feat!
If you see anything missing or want to send us feedback, please do so by signing up for appropriate mailing lists on our Community Page.
Keep on hacking and sensing!
Enjoy!