Blinky, your “Hello World!”, on Olimex
This tutorial shows you how to create, build, and run the Blinky application on an Olimex STM32-E407 board.
Prerequisites
Meet the prerequisites listed in Project Blinky.
Have a STM32-E407 development board from Olimex.
Have a ARM-USB-TINY-H connector with JTAG interface for debugging ARM microcontrollers (comes with the ribbon cable to hook up to the board)
Have a USB A-B type cable to connect the debugger to your computer.
Install the OpenOCD debugger.
Create a Project
Create a new project if you do not have an existing one. You can skip this step and proceed to Create the Targets if you already created a project.
Run the following commands to create a new project:
$ mkdir ~/dev
$ cd ~/dev
$ newt new myproj
Downloading project skeleton from apache/mynewt-blinky...
Installing skeleton in myproj...
Project myproj successfully created.

$ cd myproj

$ newt upgrade
Downloading repository mynewt-core (commit: master) ...
apache-mynewt-core successfully upgraded to version 1.7.0
$
Create the Targets
Create two targets for the Olimex board - one for the bootloader and one for the Blinky application.
Run the following newt target commands, from your project directory,
to create a bootloader target. We name the target boot_olimex.
$ newt target create boot_olimex
$ newt target set boot_olimex build_profile=optimized
$ newt target set boot_olimex app=@mcuboot/boot/mynewt
$ newt target set boot_olimex bsp=@apache-mynewt-core/hw/bsp/olimex_stm32-e407_devboard
Run the following newt target commands to create a target for the
Blinky application. We name the target olimex_blinky.
$ newt target create olimex_blinky
$ newt target set olimex_blinky build_profile=debug
$ newt target set olimex_blinky bsp=@apache-mynewt-core/hw/bsp/olimex_stm32-e407_devboard
$ newt target set olimex_blinky app=apps/blinky
Build the Bootloader
Run the newt build boot_olimex command to build the bootloader:
$ newt build boot_olimex
Building target targets/boot_olimex
Compiling repos/mcuboot/boot/bootutil/src/image_ec256.c
Compiling repos/mcuboot/boot/bootutil/src/image_ec.c
Compiling repos/mcuboot/boot/bootutil/src/image_rsa.c
Compiling bin/targets/boot_olimex/generated/src/boot_olimex-sysflash.c

     ...

Archiving libc_baselibc.a
Archiving sys_flash_map.a
Archiving sys_mfg.a
Archiving sys_sysinit.a
Archiving util_mem.a
Linking ~/dev/myproj/bin/targets/boot_olimex/app/boot/mynewt/mynewt.elf
Target successfully built: targets/boot_olimex
Build the Blinky Application
Run the newt build olimex_blinky command to build the blinky application:
$ newt build olimex_blinky
Building target targets/olimex_blinky
Assembling repos/apache-mynewt-core/hw/bsp/olimex_stm32-e407_devboard/src/arch/cortex_m4/startup_STM32F40x.s
Compiling repos/apache-mynewt-core/hw/drivers/uart/src/uart.c
Compiling repos/apache-mynewt-core/hw/cmsis-core/src/cmsis_nvic.c
Compiling repos/apache-mynewt-core/hw/bsp/olimex_stm32-e407_devboard/src/sbrk.c
Compiling apps/blinky/src/main.c
Compiling repos/apache-mynewt-core/hw/drivers/uart/uart_hal/src/uart_hal.c
Compiling repos/apache-mynewt-core/hw/bsp/olimex_stm32-e407_devboard/src/hal_bsp.c
Compiling repos/apache-mynewt-core/hw/bsp/olimex_stm32-e407_devboard/src/system_stm32f4xx.c
Compiling repos/apache-mynewt-core/hw/hal/src/hal_common.c
Compiling repos/apache-mynewt-core/hw/hal/src/hal_flash.c

   ...

Archiving sys_mfg.a
Archiving sys_sysinit.a
Archiving util_mem.a
Linking ~/dev/myproj/bin/targets/olimex_blinky/app/apps/blinky/blinky.elf
Target successfully built: targets/olimex_blinky
Sign and Create the Blinky Application Image
Run the newt create-image olimex_blinky 1.0.0 command to sign and
create an image file for the blinky application. You may assign an
arbitrary version (e.g. 1.0.0) number.
$ newt create-image olimex_blinky 1.0.0
App image succesfully generated: ~/dev/myproj/bin/targets/olimex_blinky/app/apps/blinky/blinky.img
Connect to the Board
Configure the board to bootload from flash memory and to use USB-OTG2 for the power source. Refer to the following diagrams to locate the boot jumpers and power input select jumpers on the board.
Note: The labels for the USB-OTG1 and USB-OTG2 ports on the diagram are reversed. The port labeled USB-OTG1 on the diagram is the USB-OTG2 port and the port labeled USB-OTG2 on the diagram is the USB-OTG1 port.
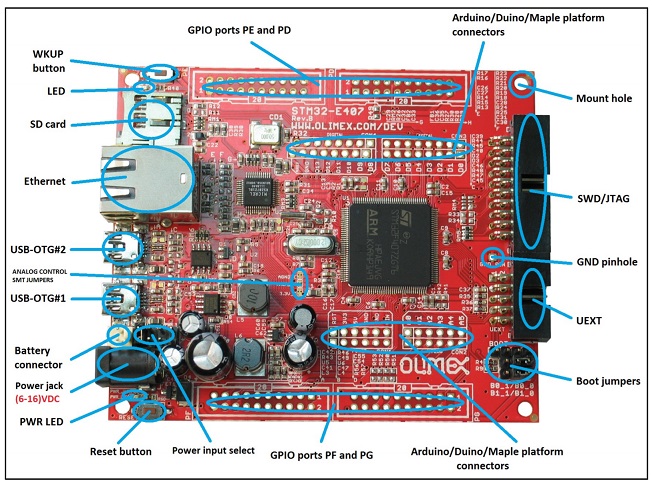
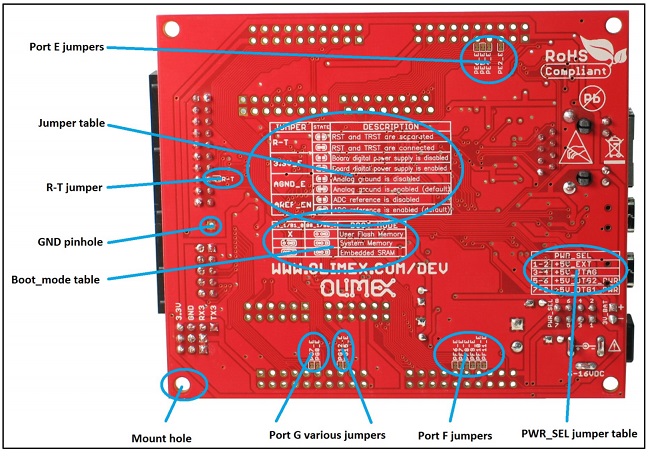
Locate the boot jumpers on the lower right corner of the board. B1_1/B1_0 and B0_1/B0_0 are PTH jumpers to control the boot mode when a bootloader is present. These two jumpers must be moved together. The board searches for the bootloader in three places: User Flash Memory, System Memory or the Embedded SRAM. For this Blinky project, we configure the board to boot from flash by jumpering B0_0 and B1_0. Note: The markings on the board may not always be accurate, and you should always refer to the manual for the correct positioning.
Locate the Power Input Select jumpers on the lower left corner of the board. Set the Power Select jumpers to position 5 and 6 to use the USB-OTG2 port for the power source. If you would like to use a different power source, refer to the OLIMEX STM32-E407 user manual for pin specifications.
Connect the USB Micro-A cable to the USB-OTG2 port on the board.
Connect the JTAG connector to the JTAG/SWD interface on the board.
Connect the USB A-B cable to the ARM-USB-TINY-H connector and your computer.
Check that the red PWR LED lights up.
Load the Bootloader and Blinky Application
Run the newt load boot_olimex command to load the bootloader image
onto the board:
$ newt load -v boot_olimex
Loading bootloader
Load command: ~/dev/myproj/repos/apache-mynewt-core/hw/bsp/olimex_stm32-e407_devboard/olimex_stm32-e407_devboard_download.sh ~/dev/myproj/repos/apache-mynewt-core/hw/bsp/olimex_stm32-e407_devboard ~/dev/myproj/bin/targets/boot_olimex/app/boot/mynewt/mynewt
Successfully loaded image.
Note: If you are using Windows and get a no device found error, you
will need to install the usb driver. Download
Zadig and run it:
Select Options > List All Devices.
Select
Olimex OpenOCD JTAG ARM-USB-TINY-Hfrom the drop down menu.Select the
WinUSBdriver.Click Install Driver.
Run the
newt load boot_olimexcommand again.
Run the newt load olimex_blinky command to load the blinky
application image onto the board:
$ newt load -v olimex_blinky
Loading app image into slot 1
Load command: ~/dev/myproj/repos/apache-mynewt-core/hw/bsp/olimex_stm32-e407_devboard/olimex_stm32-e407_devboard_download.sh ~/dev/myproj/repos/apache-mynewt-core/hw/bsp/olimex_stm32-e407_devboard ~/dev/myproj/bin/targets/olimex_blinky/app/apps/blinky/blinky
Successfully loaded image.
The LED should be blinking!
Let’s double check that it is indeed booting from flash and making the LED blink from the image in flash. Pull the USB cable off the Olimex JTAG adaptor, severing the debug connection to the JTAG port. Next power off the Olimex board by pulling out the USB cable from the board. Wait for a couple of seconds and plug the USB cable back to the board.
The LED light will start blinking again. Success!
If you want to download the image to flash and open a gdb session, use
newt debug blinky.
Note: The output of the debug session below is for Mac OS and Linux platforms. On Windows, openocd and gdb are started in separate Windows Command Prompt terminals, and the terminals are automatically closed when you quit gdb. In addition, the output of openocd is logged to the openocd.log file in your project’s base directory instead of the terminal.
Type c to continue inside the gdb session.
$ newt debug blinky
Debugging with ~/dev/myproj/hw/bsp/olimex_stm32-e407_...
Debugging ~/dev/myproj/project/blinky/bin/blinky/blinky.elf
GNU gdb (GNU Tools for ARM Embedded Processors) 7.8.0.20150604-cvs
Copyright (C) 2014 Free Software Foundation, Inc.
License GPLv3+: GNU GPL version 3 <http://gnu.org/licenses/gpl.html>
...
(info)
...
target state: halted
target halted due to debug-request, current mode: Thread
xPSR: 0x01000000 pc: 0x08000250 msp: 0x10010000
Info : accepting 'gdb' connection from 3333
Info : device id = 0x10036413
Info : flash size = 1024kbytes
Reset_Handler () at startup_STM32F40x.s:199
199     ldr    r1, =__etext
(gdb)
If you want to erase the flash and load the image again you may use the
following commands from within gdb. flash erase_sector 0 0 x tells
it to erase sectors 0 through x. When you ask it to display (in hex
notation) the contents of the sector starting at location ‘lma,’ you
should see all f’s. The memory location 0x8000000 is the start or origin
of the flash memory contents and is specified in the
olimex_stm32-e407_devboard.ld linker script. The flash memory
locations is specific to the processor.
(gdb) monitor flash erase_sector 0 0 4
erased sectors 0 through 4 on flash bank 0 in 2.296712s
(gdb) monitor mdw 0x08000000 16
0x08000000: ffffffff ffffffff ffffffff ffffffff ffffffff ffffffff ffffffff ffffffff
(0x08000020: ffffffff ffffffff ffffffff ffffffff ffffffff ffffffff ffffffff ffffffff
(0x08000000: ffffffff ffffffff ffffffff ffffffff ffffffff ffffffff ffffffff ffffffff
(0x08000020: ffffffff ffffffff ffffffff ffffffff ffffffff ffffffff ffffffff ffffffff
(gdb) monitor flash info 0