Adding OIC Sensor Support to the bleprph_oic Application
This tutorial shows you how to modify and add OIC sensor support to the bleprph_oic application. This tutorial assumes that have you completed the Enabling OIC Sensor Data Monitoring in the sensors_test Application Tutorial
Like the other off-board sensor tutorials, this tutorial uses an nRF52-DK board connected to an off-board BNO055 sensor device.
This tutorial shows you how to:
Modify the bleprph_oic application to add OIC sensor support.
Create and build the target for the new application.
Use the Mynewt Smart Device Controller iOS or Android app to view the sensor data from the device.
Prerequisites
Complete the tasks described in the Enabling OIC Sensor Data Monitoring in the sensors_test Application tutorial.
Overview on How to Add OIC Sensor Support to a BLE Application
The sensor framework makes it very easy to add OIC sensor support to an
existing BLE application. The sensor framework exports the
sensor_oic_init() function that an application calls to create the
OIC resources for the sensors and to set up the handlers to process CoAP
requests for the resources.
An application uses the oc server API in the net/oic package to
implement OIC server functionality. An application defines an OIC
application initialization handler that sets up the OIC resources it
supports. The oc_main_init() function, that an application calls
during initialization in main(), calls the OIC application handler.
To add OIC sensor support, we modify the bleprph_oic application to
call the sensor_oic_init() function in the OIC application
initialization handler.
Step 1: Copying the bleprph_oic source
1. Copy the @apache-mynewt-core/apps/bleprph_oic to a new package. We
name the new package apps/bleprph_oic_sensor. From your project
base directory, run the newt pkg copy command:
$ newt pkg copy @apache-mynewt-core/apps/bleprph_oic @apache-mynewt-core/apps/bleprph_oic_sensor
Copying package @apache-mynewt-core/apps/bleprph_oic to @apache-mynewt-core/apps/bleprph_oic_sensor
2. The newt tools creates the bleprph_oic_sensor package in the
~/dev/myproj/repos/apache-mynewt-core/apps/bleprph_oic_sensor
directory. Go to the directory to update the package pkg.yml and
source files.
$ cd repos/apache-mynewt-core/apps/bleprph_oic_sensor
Step 2: Adding Package Dependencies
Add the hw/sensor/ and the hw/sensor/creator packages as
dependencies in the pkg.yml file to include the sensor framework and
off-board sensor support.
Note: The hw/sensor package automatically includes the
net/oic package when the SENSOR_OIC setting is enabled, so you
do not need to include the net/oic package as a dependency in this
package.
 pkg.deps:
     - kernel/os
     - net/nimble/controller
     - net/nimble/host
     - net/nimble/host/services/gap
     - net/nimble/host/services/gatt
     - net/nimble/host/store/ram
     - net/nimble/transport/ram
          ...
     - hw/sensor
     - hw/sensor/creator
Step 3: Setting Syscfg Values to Enable OIC Support
Add the following setting values to syscfg.vals in the
syscfg.yml file:
SENSOR_OIC: 1: This setting enables OIC sensor support in thehw/sensorspackage.OC_SERVER: 1: This setting enables OIC server support in thenet/oicpackage.FLOAT_USER: 1: This setting enables floating pointing support in the encoding/tinycbor package.ADVERTISE_128BIT_UUID: 1andADVERTISE_16BIT_UUID: 0: These settings enable BLE 128 bit UUID and disables 16 bit UUID advertisement. The IoTivity library that is used to build the OIC Apps on the iOS and Android devices only sees 128 bit UUID advertisements.
  syscfg.vals:
      ...

      SENSOR_OIC: 1
      OC_SERVER: 1
      FLOAT_USER: 1
      ADVERTISE_128BIT_UUID: 1
      ADVERTISE_16BIT_UUID: 0
Step 4: Modifying main.c
The bleprph_oic application defines the omgr_app_init() function
for the OIC application initialization handler. The function creates an
OIC light resource. We modify the function to call the
sensor_oic_init() function to create the OIC sensor resources
instead of creating the OIC light resource.
We make the following modifications to main.c:
Add the sensor package header file.
Modify the
omgr_app_init()function to call thesensor_oic_init()function, and delete the code to create the OIC light resource.Delete the OIC application request handler functions that process the CoAP requests for the light resource.
Adding the Sensor Package Header File:
Add the sensor package header file sensor/sensor.h below
#include "bleprph.h" file:
 #include "bleprph.h"

 #include <sensor/sensor.h>
Modifying the omgr_app_init() Function
Make the following modifications to the omgr_app_init() function:
1. Delete the code segment that creates the OIC device and resource. The lines to delete are highlighted below:
  static void
  omgr_app_init(void)
  {
      oc_resource_t *res;

      oc_init_platform("MyNewt", NULL, NULL);
      oc_add_device("/oic/d", "oic.d.light", "MynewtLed", "1.0", "1.0", NULL,
                    NULL);

      res = oc_new_resource("/light/1", 1, 0);
      oc_resource_bind_resource_type(res, "oic.r.light");
      oc_resource_bind_resource_interface(res, OC_IF_RW);
      oc_resource_set_default_interface(res, OC_IF_RW);

      oc_resource_set_discoverable(res);
      oc_resource_set_periodic_observable(res, 1);
      oc_resource_set_request_handler(res, OC_GET, app_get_light);
      oc_resource_set_request_handler(res, OC_PUT, app_set_light);
      oc_add_resource(res);

  }
2. Add the following``oc_add_device()`` function call to create an OIC resource for the sensor device:
  static void
  omgr_app_init(void)
 {

      oc_init_platform("MyNewt", NULL, NULL);

      oc_add_device("/oic/d", "oic.d.sensy", "sensy", "1.0", "1.0", NULL, NULL);

 }
3. Add the call to the sensor_oic_init() function to initialize the
sensor framework OIC server support:
  static void
  omgr_app_init(void)
 {

      oc_init_platform("MyNewt", NULL, NULL);

      oc_add_device("/oic/d", "oic.d.sensy", "sensy", "1.0", "1.0", NULL, NULL);

      sensor_oic_init();

 }
Deleting the app_get_light() and app_set_light() Functions
Since we modify the application to no longer create an OIC light
resource, the app_get_light() and the app_set_light() handler
functions that process read and write requests are not used. We need to
delete the functions to avoid compilation errors. Search for the two
functions and delete them.
Step 5: Creating and Building the Application Image
In this step of the tutorial we create and build an application image for the bleprph_oic_sensor application to verify that the application serves sensor data over OIC correctly.
We use the same syscfg settings from the Enabling OIC Sensor Data Monitoring in the sensors_test Application Tutorial
1. From your project base directory, run the newt create target
command to create a new target named nrf52_bleprph_oic_bno055:
$ newt target create nrf52_bleprph_oic_bno055
Target targets/nrf52_bleprph_oic_bno055 successfully created
2. Run the newt target set command to set the app, bsp, and
build_profile variables for the target.
$ newt target set nrf52_bleprph_oic_bno055 app=@apache-mynewt-core/apps/bleprph_oic_sensor bsp=@apache-mynewt-core/hw/bsp/nrf52dk build_profile=debug
Target targets/nrf52_bleprph_oic_bno055 successfully set target.app to @apache-mynewt-core/apps/bleprph_oic_sensor
Target targets/nrf52_bleprph_oic_bno055 successfully set target.bsp to @apache-mynewt-core/hw/bsp/nrf52dk
Target targets/nrf52_bleprph_oic_bno055 successfully set target.build_profile to debug
$
3. Run the newt target set command to set I2C_0=1,
BNO055_OFB=1, BLE_MAX_CONNECTIONS=4, MSYS_1_BLOCK_COUNT=52,
MSYS_1_BLOCK_SIZE=100, and OC_APP_RESOURCES=11.
$ newt target set nrf52_bleprph_oic_bno055 syscfg=BNO055_OFB=1:I2C_0=1:BLE_MAX_CONNECTIONS=4:MSYS_1_BLOCK_COUNT=52:MSYS_1_BLOCK_SIZE=100:OC_APP_RESOURCES=11
Target targets/nrf52_bleprph_oic_bno055 successfully set target.syscfg to BNO055_OFB=1:I2C_0=1:BLE_MAX_CONNECTIONS=4:MSYS_1_BLOCK_COUNT=52:MSYS_1_BLOCK_SIZE=100:OC_APP_RESOURCES=11
$
4. Run the newt build nrf52_bleprph_oic_bno055 and
newt create-image nrf52_bleprph_oic_bno055 1.0.0 commands to build
and create the application image.
Step 6: Connecting the Sensor and Loading the Images to the Board
Perform the following steps to reboot the board with the new images:
Connect the BNO055 sensor to the nRF52-DK board. See the Enabling an Off-Board Sensor in an Existing Application Tutorial for instructions.
Note: You do not need the serial connection from your computer directly to the nRF52-DK board because we are not using the shell to view the sensor data.
Run the
newt load nrf52_bootcommand to load the bootloader. You should already have this target built from the Enabling an Off-Board Sensor in an Existing Application TutorialRun the
newt load nrf52_bno055_oic_testcommand to load the application image.Power the device OFF and ON to reboot.
Step 7: Viewing Sensor Data from the Mynewt Smart Device Controller
Start the Mynewt Smart Device Controller app on your iOS or Android device to view the sensor data. You should already have the app installed from the Enabling OIC Sensor Data Monitoring in the sensors_test Application Tutorial
The Mynewt Smart Device Controller scans for the devices when it starts up and displays the sensors it can view. The following is an example from the Android App:
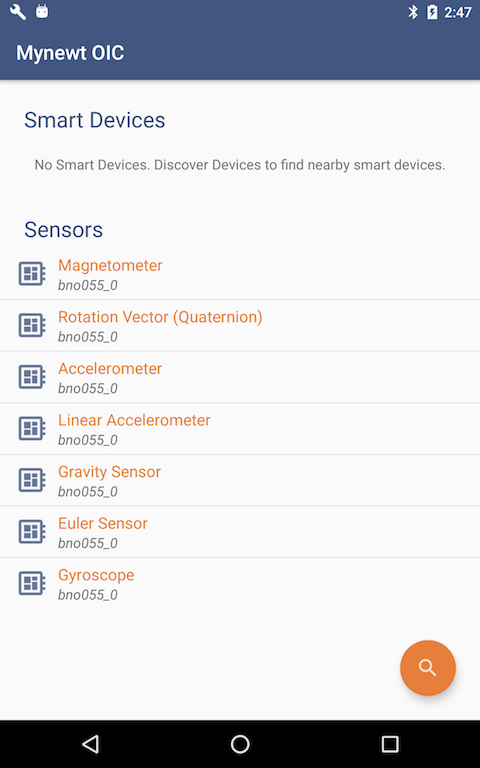
Select
Accelerometerto see the sensor data samples:
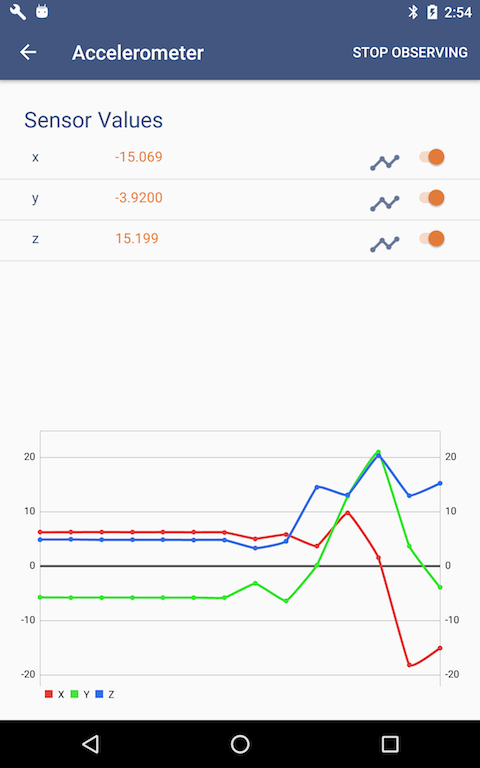
2. Move your BNO055 sensor device around to see the values for the coordinates change.