Enable Wi-Fi on Arduino MKR1000
This tutorial shows you how to enable Wi-Fi on an Arduino MKR1000 board and connect to a Wi-Fi network.
Prerequisites
Ensure that you have met the following prerequisites before continuing with this tutorial:
Have an Arduino MKR1000 board.
Have Internet connectivity to fetch remote Mynewt components.
Have a computer to build a Mynewt application and connect to the board over USB.
Have a Micro-USB cable to connect the board and the computer.
Have local Wi-Fi network that the computer is connected to and that the MKR1000 board can join.
Have a Serial Port Setup.
Have a Segger J-Link Debug Probe.
Have a J-Link 9 pin Cortex-M Adapter that allows JTAG, SWD and SWO connections between J-Link and Cortex M based target hardware systems
Install the Segger JLINK Software and documentation pack.
Install the Newt tool and toolchains (See Native Installation)
Create a project space (directory structure) and populated it with the core code repository (apache-mynewt-core) or know how to as explained in Creating Your First Project.
Read the Mynewt OS Concepts section.
Create a Project
Create a new project if you do not have an existing one. You can skip this step and proceed to fetch external packages if you already created a project.
Run the following commands to create a new project:
$ mkdir ~/dev
$ cd ~/dev
$ newt new arduinowifi
Downloading project skeleton from apache/mynewt-blinky...
Downloading repository mynewt-blinky (commit: master) ...
Installing skeleton in arduinowifi...
Project arduinowifi successfully created.
$ cd arduinowifi
$ newt upgrade
Downloading repository mynewt-core (commit: master) ...
Downloading repository mcuboot (commit: master) ...
Downloading repository mynewt-nimble (commit: master) ...
Making the following changes to the project:
apache-mynewt-core successfully upgraded to version 1.7.0
apache-mynewt-nimble successfully upgraded to version 1.2.0
mcuboot successfully upgraded to version 1.3.1
$
Fetch External Packages
Mynewt uses source code provided directly from the chip manufacturer for low level operations. Sometimes this code is licensed only for the specific manufacturer of the chipset and cannot live in the Apache Mynewt repository. That happens to be the case for the Arduino Zero board which uses Atmel SAMD21. Runtime’s git hub repository hosts such external third-party packages and the Newt tool can fetch them.
To fetch the package with MCU support for Atmel SAMD21 for Arduino Zero
from the Runtime git repository, you need to add the repository to the
project.yml file in your base project directory.
Mynewt uses source code provided directly from the chip manufacturer for low level operations. Sometimes this code is licensed only for the specific manufacturer of the chipset and cannot live in the Apache Mynewt repository. That happens to be the case for the Arduino Zero board which uses Atmel SAMD21. Runtime’s github repository hosts such external third-party packages and the Newt tool can fetch them.
To fetch the package with MCU support for Atmel SAMD21 for Arduino Zero
from the Runtime git repository, you need to add the repository to the
project.yml file in your base project directory (arduinowifi).
Here is an example project.yml file with the Arduino Zero repository
added. The sections with mynewt_arduino_zero that need to be added
to your project file are highlighted.
Note: On Windows platforms: You need to set vers to 0-dev
and use the latest master branch for both repositories.
 $ more project.yml

 project.name: "my_project"

 project.repositories:
     - apache-mynewt-core
     - mynewt_arduino_zero

 repository.apache-mynewt-core:
     type: github
     vers: 1-latest
     user: apache
     repo: mynewt-core

 repository.mynewt_arduino_zero:
     type: github
     vers: 1-latest
     user: runtimeco
     repo: mynewt_arduino_zero
 $
Install the project dependencies using the newt upgrade command
(you can specify -v for verbose output):
$ newt upgrade
Downloading repository mynewt_arduino_zero (commit: master) ...
Skipping "apache-mynewt-core": already upgraded (1.7.0)
Skipping "apache-mynewt-nimble": already upgraded (1.2.0)
Skipping "mcuboot": already upgraded (1.3.1)
Making the following changes to the project:
mynewt_arduino_zero successfully upgraded to version 1.7.0
$
NOTE: If there has been a new release of a repo used in your project
since you last installed it, the 1-latest version for the repo in
the project.yml file will refer to the new release and will not
match the installed files. In that case you will get an error message
saying so and you will need to run newt upgrade to overwrite the
existing files with the latest codebase.
Create a Target for the Bootloader
You need to create two targets for the MKR1000 board, one for the
bootloader and one for the winc1500_wifi application. Run the
following newt target commands, from your project directory, to
create a bootloader target. We name the target mkr1000_boot.
$ newt target create mkr1000_boot
$ newt target set mkr1000_boot bsp=@mynewt_arduino_zero/hw/bsp/arduino_mkr1000
$ newt target set mkr1000_boot app=@mcuboot/boot/mynewt
$ newt target set mkr1000_boot build_profile=optimized
$ newt target set mkr1000_boot syscfg=BSP_ARDUINO_ZERO_PRO=1
Create a Target for the Wi-Fi Application
Run the following newt target commands to create a target for the
winc1500_wifi application in the arduino repository. We name the
application target mkr1000_wifi.
$ newt target create mkr1000_wifi
$ newt target set mkr1000_wifi app=@mynewt_arduino_zero/apps/winc1500_wifi
$ newt target set mkr1000_wifi bsp=@mynewt_arduino_zero/hw/bsp/arduino_mkr1000
$ newt target set mkr1000_wifi build_profile=debug
$ newt target set mkr1000_boot syscfg=BSP_ARDUINO_ZERO_PRO=1
Build the Bootloader
Run the newt build mkr1000_boot command to build the bootloader:
$ newt build mkr1000_boot
Building target targets/mkr1000_boot
Compiling repos/mcuboot/boot/bootutil/src/image_rsa.c
Compiling repos/mcuboot/boot/bootutil/src/image_ec256.c
Compiling repos/apache-mynewt-core/crypto/mbedtls/src/aes.c
Compiling repos/mcuboot/boot/bootutil/src/image_ec.c
Compiling repos/mcuboot/boot/bootutil/src/image_validate.c
Compiling repos/mcuboot/boot/mynewt/src/main.c

       ...

Archiving util_mem.a
Linking ~/dev/arduinowifi/bin/targets/mkr1000_boot/app/@mcuboot/boot/mynewt/mynewt.elf
Target successfully built: targets/mkr1000_boot
$
Build the Wi-Fi Application
Run the newt build mkr1000_wifi command to build the wi-fi
application image:
$newt build mkr1000_wifi
Building target targets/mkr1000_wifi
Compiling repos/apache-mynewt-core/boot/bootutil/src/image_ec.c
Compiling repos/apache-mynewt-core/boot/bootutil/src/image_ec256.c
Compiling repos/apache-mynewt-core/boot/bootutil/src/image_rsa.c
Compiling repos/apache-mynewt-core/boot/bootutil/src/image_validate.c
Compiling repos/apache-mynewt-core/boot/bootutil/src/loader.c
           ...

Archiving util_mem.a
Linking ~/dev/arduinowifi/bin/targets/mkr1000_wifi/app/apps/winc1500_wifi/winc1500_wifi.elf
Target successfully built: targets/mkr1000_wifi
$
Sign and Create the Wi-Fi Application Image
Run the newt create-image mkr1000_wifi 1.0.0 command to sign and
create an image file for the Wi-Fi application. You may assign an
arbitrary version (e.g. 1.0.0) number.
$newt create-image  mkr1000_wifi 1.0.0
Compiling bin/targets/mkr1000_wifi/generated/src/mkr1000_wifi-sysinit-app.c
Archiving mkr1000_wifi-sysinit-app.a
Linking ~/dev/arduinowifi/bin/targets/mkr1000_wifi/app/apps/winc1500_wifi/winc1500_wifi.elf
App image succesfully generated: ~/dev/arduinowifi/bin/targets/mkr1000_wifi/app/apps/winc1500_wifi/winc1500_wifi.img
$
Connect to the Board
Connect your computer to the MKR1000 board with the Micro-USB cable.
Connect the debug probe to the JTAG port on the board using the Jlink 9-pin adapter and cable.
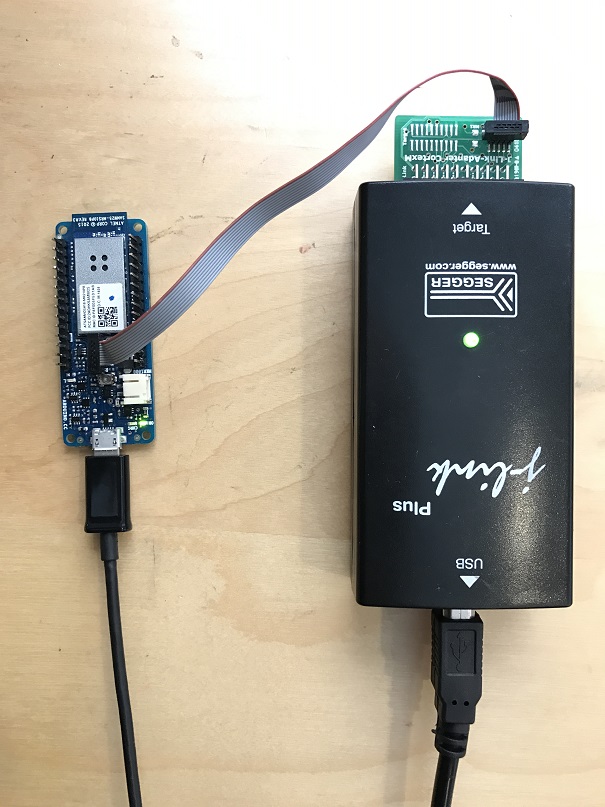
Mynewt will download and debug the target through this port. You should see a green LED come on and indicates the board has power.
Load the Bootloader onto the Board
Run the newt load mkr1000_boot command to load the bootloader onto
the board:
$ newt load mkr1000_boot
Loading bootloader
$
Load the Wi-Fi Application Image onto the Board
Run the newt load mkr1000_wifi command to load the wifi application
onto the board:
$ newt load mkr1000_wifi
Loading app image into slot 1
$
Setup a Serial Connection Between Your Computer and the Board
Set up a serial connection from your computer to the MKR1000 board (See
Serial Port Setup). On the
MKR1000 board, the TX pin is PIN 14 and the RX pin in PIN 13. 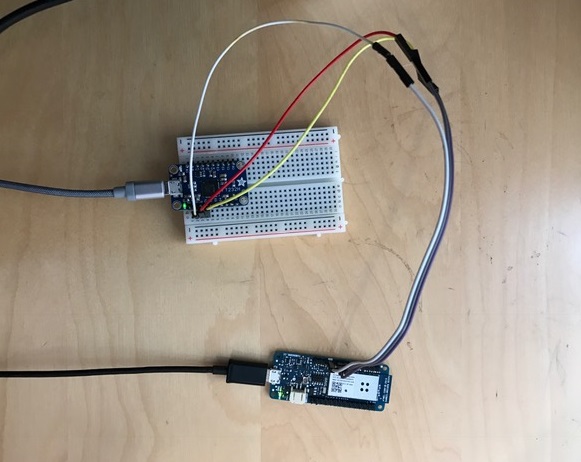
Locate the port, in the /dev directory on your computer, that the serial connection uses. The format of the port name is platform dependent:
Mac OS uses the format
tty.usbserial-<some identifier>.Linux uses the format
TTYUSB<N>, whereNis a number. For example, TTYUSB2.MinGW on Windows uses the format
ttyS<N>, whereNis a number. You must map the port name to a Windows COM port:/dev/ttyS<N>maps toCOM<N+1>. For example,/dev/ttyS2maps toCOM3.You can also use the Windows Device Manager to find the COM port number.
$ ls /dev/tty*usbserial*
/dev/tty.usbserial-1d13
$
Start Wi-Fi via console
Use a terminal emulation program to communicate with the board over the serial port. This tutorial shows a Minicom set up. Run the minicom command with the serial port you located on your computer:
Note: On Windows, you can use the PuTTY application.
$ minicom -D /dev/tty.usbserial-1d13 -b 115200
Type wifi start to start Wi-Fi.
 Welcome to minicom 2.7.1

 OPTIONS:
 Compiled on May 17 2017, 15:29:14.
 Port /dev/tty.usbserial, 15:12:10

 Press Meta-Z for help on special keys


 138465 compat> wifi start
 144570 compat> (APP)(INFO)Chip ID 1503a0
 (APP)(INFO)Firmware ver   : 19.4.4
 (APP)(INFO)Min driver ver : 19.3.0
 (APP)(INFO)Curr driver ver: 19.3.0
 wifi_init : 0
Connect to the local Wi-Fi network. Note that the MKR1000 board only supports 2.4 GHz Wi-Fi networks.
Run the wifi connect command and specify your network and . After
you are connected to your wi-fi network, run the net service command
to start network services.
 wifi connect
 037624 wifi_request_scan : 0
 037627 compat> scan_results 7: 0
 038454 wifi_connect : 0
 039451 connect_done : 0
 039958 dhcp done
 192.168.0.135
 040169 get sys time response 2017.7.12-22.41.33
 net service
The board is connected to the network succesfully and has IP address: 192.168.0.135
Establish TCP Connection and Talk!
From a terminal on your computer, telnet to ports 7, 9, or 19 using the IP address your board has been assigned. Type something on this terminal and see the console output (on minicom). Can you see the difference in the behaviors?
$telnet  192.168.0.135 7
Trying 192.168.0.135...
Connected to 192.168.0.135.
Escape character is '^]'.
hello
hello
^]
telnet> q
$
One port echoes whatever is typed, one discards everything it gets, and
the third spews out bits constantly. Type wifi stop to disable WiFi
on the Arduino board.